jvm锁失效的情况:
- Bean是多例:注意单例的controller使用
@Autowired注入@Scope(value = "prototype")标注的service,在创建时已经确定service,service不会改变了,spring官方可能对于加了@Scope的bean的本意,并不是每次访问都创建一个新的bean,而是每个使用到的地方创建一个新的bean。 - 事务:原因是事务提交是在释放锁之后进行的,假设线程A将数据由2修改为1,由于释放锁,线程B是不可以读到线程2未提交的数据,所以读到的还是2。如果使用
read uncommitted事务隔离级别的可以解决,但是我们是不允许mysql数据库使用read uncommitted事务隔离级别的。 - 集群部署:不在JVM环境肯定会失效。随着业务发展的需要,原单体单机部署的系统被演化成分布式集群系统后,由于分布式系统多线程、多进程并且分布在不同机器上,这将使原单机部署情况下的并发控制锁策略失效,单纯的Java API并不能提供分布式锁的能力。为了解决这个问题就需要一种跨JVM的互斥机制来控制共享资源的访问,这就是分布式锁要解决的问题!
分布式锁主流的实现方案:
- 基于数据库实现分布式锁
- 基于缓存(Redis等)
- 基于Zookeeper
一,redis实现分布式锁
1.1 setnx+expire
提到Redis的分布式锁,很多小伙伴马上就会想到setnx+ expire命令。即先用setnx来抢锁,如果抢到之后,再用expire给锁设置一个过期时间,防止锁忘记了释放,但由于setnx+ expire不是原子操作,可能会导致setnx命令执行完毕后,服务器宕机了,因为此时并没有设置过期时间就会导致,别的线程永远获取不到锁。为解决setnx+ expire不是原子操作问题,常用的方式:
方式一(不推荐):使用setnx加锁的时候,将系统时间+锁过期时间作为值。在每次加锁之前,先获取锁的值,如果没有获取到,直接尝试加锁;如果获取到值,就与当前时间比较,如果小于当前时间,可以删除锁后自己加锁。解决了方案一发生异常,锁得不到释放的问题。但是这个方案还有别的缺点:过期时间是客户端自己生成的(System.currentTimeMillis()是当前系统的时间),必须要求分布式环境下,每个客户端的时间必须同步。该锁没有保存持有者的唯一标识,可能被别的客户端释放/解锁。
方式二(推荐):Lua脚本来保证原子性(包含setnx和expire两条指令)
客户端测试命令:
127.0.0.1:6379> eval "if redis.call('setnx',KEYS[1],ARGV[1]) == 1 then redis.call('expire',KEYS[1],ARGV[2]) else return 0 end" 1 "lock" 3000
(integer) 0
127.0.0.1:6379>
java代码逻辑:
public void tryLock(){
   String luaText = "if redis.call('setnx',KEYS[1],ARGV[1]) == 1 " +
					"   then redis.call('expire',KEYS[1],ARGV[2]) " +
					"else " +
					"   return 0 " +
					"end;";
	DefaultRedisScript redisScript = new DefaultRedisScript<>(luaText,Long.class);
	Long result = (Long) redisTemplate.execute(redisScript, Arrays.asList("lock"),3000);
	if(result != 0){
		// 处理业务逻辑
		// 删除锁
		redisTemplate.delete("lock");
	}else {
		try {
			Thread.sleep(100); // 休息一下再次获取锁
		} catch (InterruptedException e) {
			e.printStackTrace();
		}
		tryLock();
	}
}
方式三(非常推荐):spring-data-redis 2.1.x 版本以上的redisTemplate可以在设置setnx的时候同时设置过期时间:
public void tryLock(){
	Boolean lock = redisTemplate.opsForValue().setIfAbsent("lock", "ok", 3, TimeUnit.SECONDS);
	if(lock){
		// 处理业务逻辑

		redisTemplate.delete("lock");// 删除锁
	}else {
		try {
			Thread.sleep(100); // 休息一下
		} catch (InterruptedException e) {
			e.printStackTrace();
		}
		tryLock(); // 再次获取锁
	}
}
1.2 UUID 防误删
在讲 UUID 防误删之前,先说一下,误删产生的流程,以方式三代码为例:
public void tryLock(){
	Boolean lock = redisTemplate.opsForValue().setIfAbsent("lock", "ok", 3, TimeUnit.SECONDS); // 标记①
	if(lock){
		// 处理业务逻辑
		redisTemplate.delete("lock");// 标记②,
	}else {
		try {
			Thread.sleep(100);
		} catch (InterruptedException e) {
			e.printStackTrace();
		}
		tryLock();
	}
}
假设:流程A执行完标记①加锁成功,开始执行业务逻辑,但是由于处理时间较长,已经超过设置的过期时间了,此时流程B执行标记①,发现可以执行加锁成功,开始执行业务逻辑,这时流程A处理业务逻辑执行完毕了,开始删除锁,这种情况就是流程A删除了流程B的锁。
UUID 防误删:
public void tryLock(){
	String uuid = UUID.randomUUID().toString().replace("-","");
	Boolean lock = redisTemplate.opsForValue().setIfAbsent("lock", uuid, 3, TimeUnit.SECONDS);
	if(lock){
		// 处理业务逻辑
		if(uuid.equals(redisTemplate.opsForValue().get("lock"))){// 删除锁
			redisTemplate.delete("lock");
		}
	}else {
		try {
			Thread.sleep(100); // 休息一下再次获取锁
		} catch (InterruptedException e) {
			e.printStackTrace();
		}
		tryLock();
	}
}
如上代码,虽然逻辑是没问题的但是,获取锁比较判断删除锁不是原子性的,我们可以使用lua脚本实现原子性删除锁:
客户端测试脚本:
127.0.0.1:6379> eval "if redis.call('get', KEYS[1]) == ARGV[1] then return redis.call('del', KEYS[1]) else return 0 end" 1 lock yes
(integer) 0
127.0.0.1:6379>
代码实现:
public void tryLock(){
	String uuid = UUID.randomUUID().toString().replace("-","");
	Boolean lock = redisTemplate.opsForValue().setIfAbsent("lock", uuid, 3, TimeUnit.SECONDS);
	if(lock){
		// 处理业务逻辑

		// 删除锁
		String script = "if redis.call('get', KEYS[1]) == ARGV[1] then return redis.call('del', KEYS[1]) else return 0 end";
		DefaultRedisScript redisScript = new DefaultRedisScript<>(script,Long.class);
		redisTemplate.execute(redisScript,Arrays.asList("lock"),uuid);
	}else {
		try {
			Thread.sleep(100); // 休息一下再次获取锁
		} catch (InterruptedException e) {
			e.printStackTrace();
		}
		tryLock();
	}
}
1.3 超时延期
上面我们通过UUID防止了,误删锁,但是本质上业务处理时间 > 过期时间的问题并没有解决。
public void tryLock01(){
	String uuid = UUID.randomUUID().toString().replace("-","");
	Boolean lock = redisTemplate.opsForValue().setIfAbsent("lock", uuid, 3, TimeUnit.SECONDS);
	if(lock){
		lengthenTime(redisTemplate,uuid,3);// 加锁成功,开启一个定时任务
		// 处理业务逻辑

		// 删除锁
		String script = "if redis.call('get', KEYS[1]) == ARGV[1] then return redis.call('del', KEYS[1]) else return 0 end";
		DefaultRedisScript redisScript = new DefaultRedisScript<>(script,Long.class);
		redisTemplate.execute(redisScript,Arrays.asList("lock"),uuid);
	}else {
		try {
			Thread.sleep(100); // 休息一下再次获取锁
		} catch (InterruptedException e) {
			e.printStackTrace();
		}
		tryLock();
	}
}
private void lengthenTime(RedisTemplate redisTemplate,String uuid,int expire){
	String script = "if redis.call('hexists',KEY[1],ARGV[1]) == 1 " +
			"then " +
			" return  redis.call('expire',KEY[1],ARGV[2]) " +
			"else  " +
			"return 0 " +
			"end";
	new Timer().schedule(new TimerTask() {
		@Override
		public void run() {
			if((Boolean)redisTemplate.execute(new DefaultRedisScript<>(script,Boolean.class),Arrays.asList("lock"),uuid,expire)){
				lengthenTime(redisTemplate,uuid,expire); // 延期成功后,继续设置延期
			}
		}
	},expire*1000/3); // 表示,expire*1000/3 秒后仅执行此一次
} 上面说的那么多都是我们手动实现的,这些能够正常使用,但是考虑的还是不够完美,比如说锁可重入,公平锁的实现等等,虽然我们能够写出来,但是别人已经写好的,我们直接使用岂不是更加爽歪歪。
1.4 Redisson
Redisson 是一个在 Redis 的基础上实现的 Java 驻内存数据网格(In-Memory Data Grid)。它不仅提供了一系列的分布式的 Java 常用对象,还实现了可重入锁(Reentrant Lock)、公平锁(Fair Lock、联锁(MultiLock)、 红锁(RedLock)、 读写锁(ReadWriteLock)等,还提供了许多分布式服务。Redisson 提供了使用 Redis 的最简单和最便捷的方法。Redisson 的宗旨是促进使用者对 Redis 的关注分离(Separation of Concern),从而让使用者能够将精力更集中地放在处理业务逻辑上。
1.4.1 获取RedissonClient
第一步,引入jar包:
<dependency>
    <groupId>org.redisson</groupId>
    <artifactId>redisson</artifactId>
    <version>2.7.0</version>
</dependency>
第二步,配置RedissonClient:
@Configuration
public class RedissonConfig {
    @Bean
    public RedissonClient redissonClient(){
        Config config = new Config();
        config.useSingleServer()
                .setAddress("redis://127.0.0.1:6379")
                .setDatabase(0);
        return Redisson.create(config);
    }

}
不同模式的选择如下:
单机模式:
Config config = new Config();
config.useSingleServer()
        .setAddress("redis://127.0.0.1:6379")
        .setPassword("123456")
        .setDatabase(0);
RedissonClient redissonClient = Redisson.create(config);
主从模式:
Config config = new Config();
config.useMasterSlaveServers()
    //可以用"rediss://"来启用SSL连接
    .setMasterAddress("redis://127.0.0.1:6379")
    .addSlaveAddress("redis://127.0.0.1:6389", "redis://127.0.0.1:6332", "redis://127.0.0.1:6419")
    .addSlaveAddress("redis://127.0.0.1:6399");
RedissonClient redisson = Redisson.create(config);
哨兵模式:
Config config = new Config();
config.useSentinelServers()
    .setMasterName("mymaster")
    .addSentinelAddress("127.0.0.1:26389", "127.0.0.1:26379")
    .addSentinelAddress("127.0.0.1:26319");
RedissonClient redisson = Redisson.create(config);
集群模式:
Config config = new Config();
config.useClusterServers()
    .setScanInterval(2000) // 集群状态扫描间隔时间,单位是毫秒
    .addNodeAdsdress("redis://127.0.0.1:7000", "redis://127.0.0.1:7001")
    .addNodeAddress("redis://127.0.0.1:7002");
RedissonClient redisson = Redisson.create(config);
1.4.2 lock原理
public void tryLock(){
	RLock lock = redissonClient.getLock("lock"); // 获取一把锁
	lock.lock(); // 加锁
	try {
		// 业务逻辑
	} finally {
		lock.unlock(); // 解锁
	}
}Redisson的加锁方法有两个,tryLock和lock,使用上的区别在于tryLock可以设置锁的过期时长leaseTime和等待时长waitTime,核心处理的逻辑都差不多
lock原理:
public void lock() {
	try {
		this.lockInterruptibly();
	} catch (InterruptedException var2) {
		Thread.currentThread().interrupt();
	}

}继续跟进this.lockInterruptibly()方法
public void lockInterruptibly() throws InterruptedException {
	this.lockInterruptibly(-1L, (TimeUnit)null);
}继续跟进this.lockInterruptibly(-1L, (TimeUnit)null);方法
public void lockInterruptibly(long leaseTime, TimeUnit unit) throws InterruptedException {
	Long ttl = this.tryAcquire(leaseTime, unit); // 尝试加锁,标记①
	if (ttl != null) { // 不为空,表示锁已经存在,返回的是锁的剩余过期时间
		long threadId = Thread.currentThread().getId(); // 获取线程id
		RFuture<RedissonLockEntry> future = this.subscribe(threadId); // 订阅分布式锁, 解锁时进行通知,标记②,
		this.get(future);
		try {
			while(true) { // 通知唤醒后
				ttl = this.tryAcquire(leaseTime, unit); //继续尝试获取锁
				if (ttl == null) { // 表示获取锁成功
					return;
				}

				if (ttl >= 0L) {
                    // 标记③,Semaphore获取锁超时阻塞,这个知道过期时间所以等待超时阻塞
					this.getEntry(threadId).getLatch().tryAcquire(ttl, TimeUnit.MILLISECONDS);
				} else { // Semaphore 获取锁阻塞,这ttl = -1 可能是永不过期,也就不知道过期时间所以直接阻塞
					this.getEntry(threadId).getLatch().acquire();
				}
			}
		} finally {
			this.unsubscribe(future, threadId);
		}
	}
}解析标记③,this.getEntry(threadId)方法的返回值是RedissonLockEntry,RedissonLockEntry的getLatch方法如下:
public class RedissonLockEntry implements PubSubEntry<RedissonLockEntry> {
    private final Semaphore latch = new Semaphore(0); // 默认0,调用tryAcquire会阻塞
    // 省略
    public Semaphore getLatch() {
        return this.latch;
    }
}
所以当再次尝试获取锁时,过期时间如果还大于0,就调用Semaphore的tryAcquire方法阻塞,那么Semaphore信号量又是由谁控制呢,何时才能release呢,这里又需要解析一下标记②,订阅分布式锁, 解锁时进行通知的this.subscribe(threadId);方法:
protected RFuture<RedissonLockEntry> subscribe(long threadId) {
	 return PUBSUB.subscribe(this.getEntryName(), this.getChannelName(), this.commandExecutor.getConnectionManager());
}继续跟进PUBSUB.subscribe(this.getEntryName(), this.getChannelName(), this.commandExecutor.getConnectionManager())方法:
public RFuture<E> subscribe(final String entryName, final String channelName, final ConnectionManager connectionManager) {
	final AtomicReference<Runnable> listenerHolder = new AtomicReference();
	final AsyncSemaphore semaphore = connectionManager.getSemaphore(channelName);
	final RPromise<E> newPromise = new PromiseDelegator<E>(connectionManager.newPromise()) {
		public boolean cancel(boolean mayInterruptIfRunning) {
			return semaphore.remove((Runnable)listenerHolder.get());
		}
	};
	Runnable listener = new Runnable() {
		public void run() {
			E entry = (PubSubEntry)PublishSubscribe.this.entries.get(entryName);// 监听
			if (entry != null) { // 监听到释放锁
				entry.aquire();
				semaphore.release();
				entry.getPromise().addListener(new TransferListener(newPromise));
			} else {
				E value = PublishSubscribe.this.createEntry(newPromise);
				value.aquire();
				E oldValue = (PubSubEntry)PublishSubscribe.this.entries.putIfAbsent(entryName, value);
				if (oldValue != null) {
					oldValue.aquire();
					semaphore.release();
					oldValue.getPromise().addListener(new TransferListener(newPromise));
				} else {
					RedisPubSubListener<Object> listener = PublishSubscribe.this.createListener(channelName, value);
					connectionManager.subscribe(LongCodec.INSTANCE, channelName, listener, semaphore);
				}
			}
		}
	};
	semaphore.acquire(listener);
	listenerHolder.set(listener);
	return newPromise;
}
这段代码的作用在于将当前线程的threadId添加到一个AsyncSemaphore中,并且设置一个redis的监听器,这个监听器是通过redis的发布、订阅功能实现的。一旦监听器收到redis发来的消息,就从中获取与当前thread相关的,如果是锁被释放的消息,就立马通过操作Semaphore也就是调用release方法。
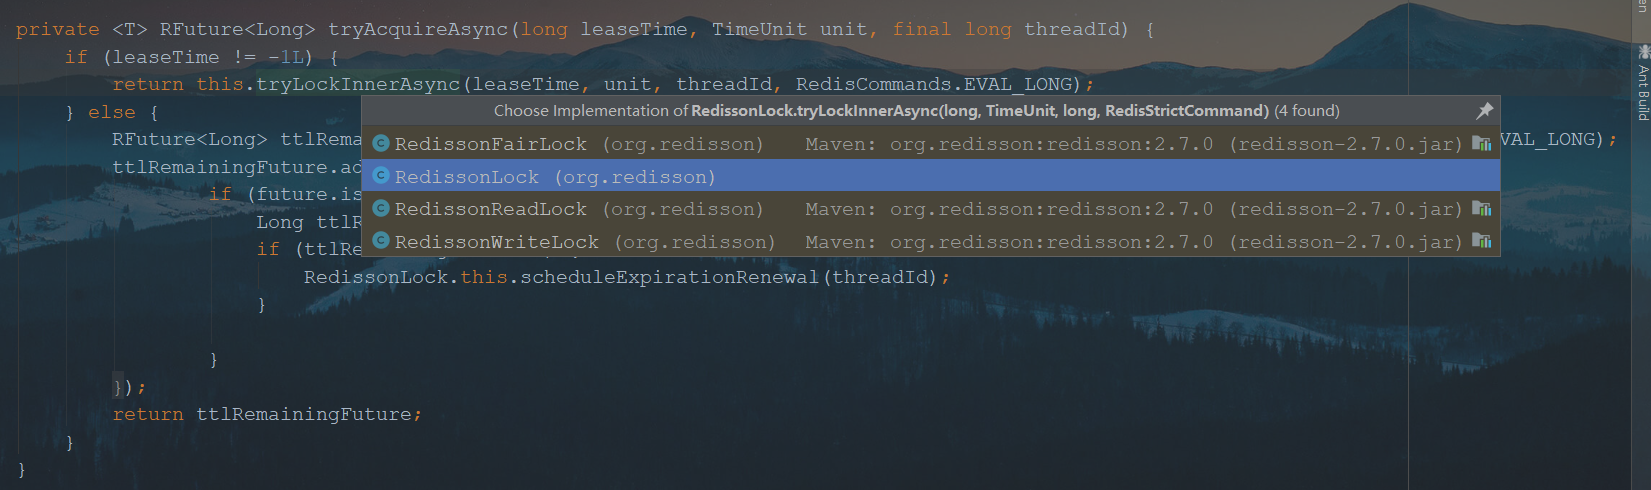
解析标记①,获取锁跟进this.tryAcquire(leaseTime, unit);方法:
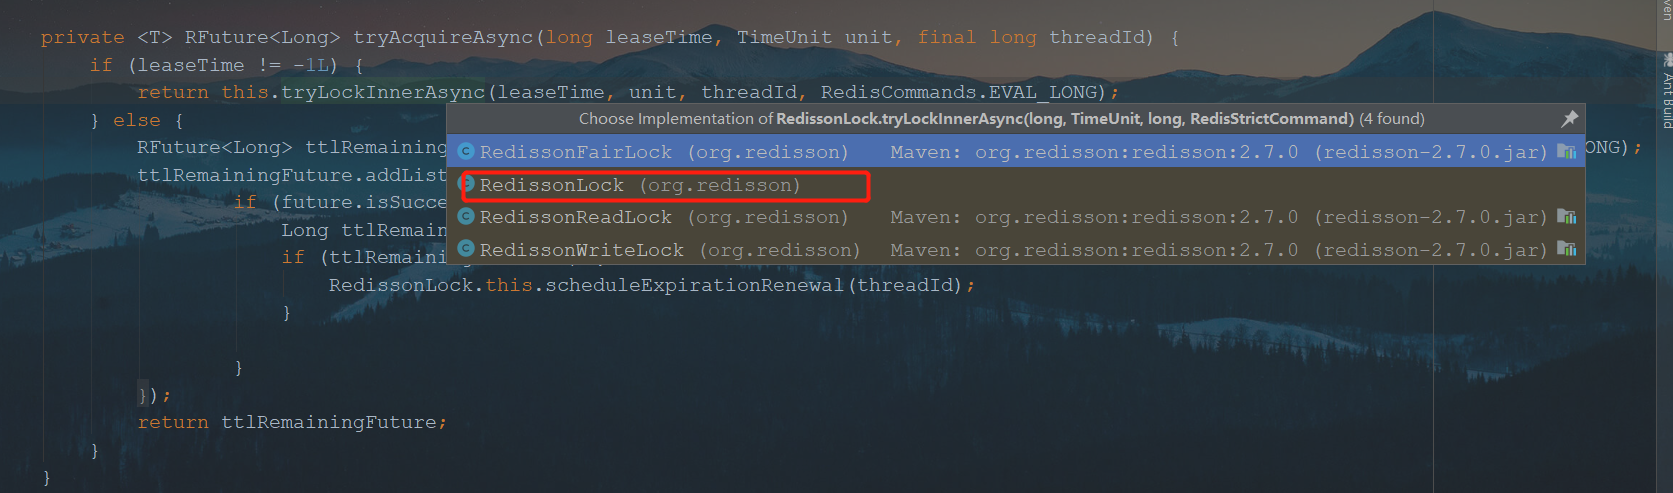
tryAcquire方法有很多实现,这里我们看最简单的RedissonLock的:
private Long tryAcquire(long leaseTime, TimeUnit unit) {
	 return (Long)this.get(this.tryAcquireAsync(leaseTime, unit, Thread.currentThread().getId()));
}继续跟进this.tryAcquireAsync(leaseTime, unit, Thread.currentThread().getId())方法:
private <T> RFuture<Long> tryAcquireAsync(long leaseTime, TimeUnit unit, final long threadId) {
	if (leaseTime != -1L) { // leaseTime != -1L 表示设置过期时间了
		return this.tryLockInnerAsync(leaseTime, unit, threadId, RedisCommands.EVAL_LONG);
	} else {// 没有设置过期时间,走下面的逻辑,增加了一个监听器也就是传说中的watchDog
		RFuture<Long> ttlRemainingFuture = this.tryLockInnerAsync(30L, TimeUnit.SECONDS, threadId, RedisCommands.EVAL_LONG);
		ttlRemainingFuture.addListener(new FutureListener<Long>() {
			public void operationComplete(Future<Long> future) throws Exception {
				if (future.isSuccess()) {
					Long ttlRemaining = (Long)future.getNow();
					if (ttlRemaining == null) {
						RedissonLock.this.scheduleExpirationRenewal(threadId);
					}

				}
			}
		});
		return ttlRemainingFuture;
	}
}上面不管有没有设置过期时间都会执行tryLockInnerAsync方法:
<T> RFuture<T> tryLockInnerAsync(long leaseTime, TimeUnit unit, long threadId, RedisStrictCommand<T> command) {
	this.internalLockLeaseTime = unit.toMillis(leaseTime);
	return this.commandExecutor.evalWriteAsync(this.getName(), LongCodec.INSTANCE, command, "if (redis.call('exists', KEYS[1]) == 0) then redis.call('hset', KEYS[1], ARGV[2], 1); redis.call('pexpire', KEYS[1], ARGV[1]); return nil; end; if (redis.call('hexists', KEYS[1], ARGV[2]) == 1) then redis.call('hincrby', KEYS[1], ARGV[2], 1); redis.call('pexpire', KEYS[1], ARGV[1]); return nil; end; return redis.call('pttl', KEYS[1]);", Collections.singletonList(this.getName()), new Object[]{this.internalLockLeaseTime, this.getLockName(threadId)});
}
这里就是核心了通过lua脚本加锁,这段脚本命令还是有点意思的,简单解读一下:
"if (redis.call('exists', KEYS[1]) == 0) then " +
  "redis.call('hset', KEYS[1], ARGV[2], 1); " +
  "redis.call('pexpire', KEYS[1], ARGV[1]); " +
  "return nil; " +
"end; " +
"if (redis.call('hexists', KEYS[1], ARGV[2]) == 1) then " +
  "redis.call('hincrby', KEYS[1], ARGV[2], 1); " +
  "redis.call('pexpire', KEYS[1], ARGV[1]); " +
  "return nil; " +
"end; " +
"return redis.call('pttl', KEYS[1]);"
先用
exists key命令判断是否锁是否被占据了,没有的话就用hset命令写入,key默认为anyLock,字段是线程ID,值为1,表示当前线程加锁次数。再次判断锁判断是否是当前线程占据的,是的话值加1,表示当前线程加锁重入次数+1;
如果上面两个判断都不满足,表示锁被占用了但不是自己占用的,就返回过期时间。
1.4.3 watchDog
加锁的流程我们看过了,回过头看看,设置过期时间时watchDog的实现流程
private <T> RFuture<Long> tryAcquireAsync(long leaseTime, TimeUnit unit, final long threadId) {
	if (leaseTime != -1L) { // leaseTime != -1L 表示设置过期时间了
		return this.tryLockInnerAsync(leaseTime, unit, threadId, RedisCommands.EVAL_LONG);
	} else {// 没有设置过期时间,走下面的逻辑,增加了一个监听器也就是传说中的watchDog
		RFuture<Long> ttlRemainingFuture = this.tryLockInnerAsync(30L, TimeUnit.SECONDS, threadId, RedisCommands.EVAL_LONG); // 和上面一样加锁
		ttlRemainingFuture.addListener(new FutureListener<Long>() { // 设置一个监听,加锁完成就调用监听
			public void operationComplete(Future<Long> future) throws Exception {
				if (future.isSuccess()) {
					Long ttlRemaining = (Long)future.getNow();
					if (ttlRemaining == null) { // 判断加锁成功
						RedissonLock.this.scheduleExpirationRenewal(threadId); //核心
					}

				}
			}
		});
		return ttlRemainingFuture;
	}
}跟进RedissonLock.this.scheduleExpirationRenewal(threadId);方法:
private void scheduleExpirationRenewal(final long threadId) {
	if (!expirationRenewalMap.containsKey(this.getEntryName())) {
        // Timeout封装了Timer,也是通TimerTask提交任务的
		Timeout task = this.commandExecutor.getConnectionManager().newTimeout(new TimerTask() {
			public void run(Timeout timeout) throws Exception {
                // 续期的lua脚本
				RFuture<Boolean> future = RedissonLock.this.commandExecutor.evalWriteAsync(RedissonLock.this.getName(), LongCodec.INSTANCE, RedisCommands.EVAL_BOOLEAN, "if (redis.call('hexists', KEYS[1], ARGV[2]) == 1) then redis.call('pexpire', KEYS[1], ARGV[1]); return 1; end; return 0;", Collections.singletonList(RedissonLock.this.getName()), new Object[]{RedissonLock.this.internalLockLeaseTime, RedissonLock.this.getLockName(threadId)});

				future.addListener(new FutureListener<Boolean>() {
					public void operationComplete(Future<Boolean> future) throws Exception {
						RedissonLock.expirationRenewalMap.remove(RedissonLock.this.getEntryName());
						if (!future.isSuccess()) {
							RedissonLock.log.error("Can't update lock " + RedissonLock.this.getName() + " expiration", future.cause());
						} else {
							if ((Boolean)future.getNow()) { // 如果成功
								RedissonLock.this.scheduleExpirationRenewal(threadId); // 继续续期
							}

						}
					}
				});
			}
		}, this.internalLockLeaseTime / 3L, TimeUnit.MILLISECONDS); // TimerTask任务的执行时间也是1/3的过期时间
		// 续期失败执行以下代码
        if (expirationRenewalMap.putIfAbsent(this.getEntryName(), task) != null) {
			task.cancel(); // 取消任务
		}

	}
}
重点看一看续期的lua脚本:
"if (redis.call('hexists', KEYS[1], ARGV[2]) == 1) " +
"then " +
"    redis.call('pexpire', KEYS[1], ARGV[1]); " +
"    return 1; " +
"end; " +
"    return 0;";
脚本也非常简单,如果还是当前线程拥有锁就,延长过期时间。
1.4.4 可重入锁
可重入锁没什么好说的Lua脚本就说明了,如下方式加入的锁就是可重入的:
public void tryLock(){
	RLock lock = redissonClient.getLock("lock"); // 获取一把锁
	lock.lock(); // 加锁
	try {
		// 业务逻辑
	} finally {
		lock.unlock(); // 解锁
	}
}
通过redis的hash的数据结构+lua脚本实现。
1.4.5 读写锁
读锁:
public void tryReadLock(){
	RReadWriteLock rwlock = redissonClient.getReadWriteLock("lock");// 获取一把锁
	RLock lock = rwlock.readLock(); // 读锁
	lock.lock(); // 加锁
	try {
		// 业务逻辑
	} finally {
		lock.unlock(); // 解锁
	}
}
写锁:
public void tryWriteLock(){
	RReadWriteLock rwlock = redissonClient.getReadWriteLock("lock");// 获取一把锁
	RLock lock = rwlock.writeLock(); // 写锁
	lock.lock(); // 加锁
	try {
		// 业务逻辑
	} finally {
		lock.unlock(); // 解锁
	}
}
原理:获取锁的流程这里就不在跟一遍了,上面解析lock方法时已经跟过了,我们接下来看RedissReadLock和RedissWriteLock,
先看RedissReadLock:
<T> RFuture<T> tryLockInnerAsync(long leaseTime, TimeUnit unit, long threadId, RedisStrictCommand<T> command) {
	this.internalLockLeaseTime = unit.toMillis(leaseTime);
	return this.commandExecutor.evalWriteAsync(this.getName(), LongCodec.INSTANCE, command, "local mode = redis.call('hget', KEYS[1], 'mode'); if (mode == false) then redis.call('hset', KEYS[1], 'mode', 'read'); redis.call('hset', KEYS[1], ARGV[2], 1); redis.call('pexpire', KEYS[1], ARGV[1]); return nil; end; if (mode == 'read') then redis.call('hincrby', KEYS[1], ARGV[2], 1); redis.call('pexpire', KEYS[1], ARGV[1]); return nil; end;return redis.call('pttl', KEYS[1]);", Arrays.asList(this.getName()), new Object[]{this.internalLockLeaseTime, this.getLockName(threadId)});
}
把lua脚本拿出来,看看如下:
"local mode = redis.call('hget', KEYS[1], 'mode'); " +
"if (mode == false) " +
"then " +
"   redis.call('hset', KEYS[1], 'mode', 'read'); " +
"   redis.call('hset', KEYS[1], ARGV[2], 1); " +
"   redis.call('pexpire', KEYS[1], ARGV[1]); " +
"   return nil; " +
"end; " +
"if (mode == 'read') " +
"then " +
"   redis.call('hincrby', KEYS[1], ARGV[2], 1); " +
"   redis.call('pexpire', KEYS[1], ARGV[1]); " +
"   return nil; end;" +
"return redis.call('pttl', KEYS[1]);";
先获取锁的模式,判断锁的模式:
- 如果
mode == false表示既没有读锁,也没有写锁,可以设置锁模式为read,同时设置线程id,重入次数,过期时间等。 - 如果
mode == read表示存在读锁,hincrby命令可以实现存在就自增,不存在就添加。 - 如果以上条件都不满足,锁已经被占用,加锁失败,返回过期时间。
再看RedissWriteLock:
<T> RFuture<T> tryLockInnerAsync(long leaseTime, TimeUnit unit, long threadId, RedisStrictCommand<T> command) {
	this.internalLockLeaseTime = unit.toMillis(leaseTime);
	return this.commandExecutor.evalWriteAsync(this.getName(), LongCodec.INSTANCE, command, "local mode = redis.call('hget', KEYS[1], 'mode'); if (mode == false) then redis.call('hset', KEYS[1], 'mode', 'write'); redis.call('hset', KEYS[1], ARGV[2], 1); redis.call('pexpire', KEYS[1], ARGV[1]); return nil; end; if (mode == 'write') then if (redis.call('hexists', KEYS[1], ARGV[2]) == 1) then redis.call('hincrby', KEYS[1], ARGV[2], 1); redis.call('pexpire', KEYS[1], ARGV[1]); return nil; end; end;return redis.call('pttl', KEYS[1]);", Arrays.asList(this.getName()), new Object[]{this.internalLockLeaseTime, this.getLockName(threadId)});
}
也把lua脚本拿出来,看看如下:
"local mode = redis.call('hget', KEYS[1], 'mode'); " +
"if (mode == false) " +
"then " +
"   redis.call('hset', KEYS[1], 'mode', 'write'); " +
"   redis.call('hset', KEYS[1], ARGV[2], 1); " +
"   redis.call('pexpire', KEYS[1], ARGV[1]); " +
"   return nil; " +
"end; " +
"if (mode == 'write') " +
"then " +
"   if (redis.call('hexists', KEYS[1], ARGV[2]) == 1) " +
"       then redis.call('hincrby', KEYS[1], ARGV[2], 1); " +
"       redis.call('pexpire', KEYS[1], ARGV[1]); " +
"       return nil; " +
"   end; " +
"end;" +
"return redis.call('pttl', KEYS[1]);";
先获取锁的模式,判断锁的模式:
- 如果
mode == false表示既没有读锁,也没有写锁,可以设置锁模式为write,同时设置线程id,重入次数,过期时间等。 - 如果
mode == write表示存写锁锁,判断是否是自己添加的写锁,是的话就重入次数+1,盐仓过期时间。 - 如果以上条件都不满足,锁已经被占用,加锁失败,返回过期时间。
1.4.6 公平锁
public void tryFairLock(){
	RLock lock = redissonClient.getFairLock("lock");// 获取一把锁
	lock.lock(); // 加锁
	try {
		// 业务逻辑
	} finally {
		lock.unlock(); // 解锁
	}
}
原理:获取锁的流程这里就不在跟一遍了,上面解析lock方法时已经跟过了,我们接下来看RedissFairLock
<T> RFuture<T> tryLockInnerAsync(long leaseTime, TimeUnit unit, long threadId, RedisStrictCommand<T> command) {
	this.internalLockLeaseTime = unit.toMillis(leaseTime);
	long threadWaitTime = 5000L;
	long currentTime = System.currentTimeMillis();
	if (command == RedisCommands.EVAL_NULL_BOOLEAN) {
		return this.commandExecutor.evalWriteAsync(this.getName(), LongCodec.INSTANCE, command, "while true do local firstThreadId2 = redis.call('lindex', KEYS[2], 0);if firstThreadId2 == false then break;end; local timeout = tonumber(redis.call('zscore', KEYS[3], firstThreadId2));if timeout <= tonumber(ARGV[3]) then redis.call('zrem', KEYS[3], firstThreadId2); redis.call('lpop', KEYS[2]); else break;end; end;if (redis.call('exists', KEYS[1]) == 0) and ((redis.call('exists', KEYS[2]) == 0) or (redis.call('lindex', KEYS[2], 0) == ARGV[2])) then redis.call('lpop', KEYS[2]); redis.call('zrem', KEYS[3], ARGV[2]); redis.call('hset', KEYS[1], ARGV[2], 1); redis.call('pexpire', KEYS[1], ARGV[1]); return nil; end; if (redis.call('hexists', KEYS[1], ARGV[2]) == 1) then redis.call('hincrby', KEYS[1], ARGV[2], 1); redis.call('pexpire', KEYS[1], ARGV[1]); return nil; end; return 1;", Arrays.asList(this.getName(), this.getThreadsQueueName(), this.getTimeoutSetName()), new Object[]{this.internalLockLeaseTime, this.getLockName(threadId), currentTime});
	} else if (command == RedisCommands.EVAL_LONG) {
		return this.commandExecutor.evalWriteAsync(this.getName(), LongCodec.INSTANCE, command, "while true do local firstThreadId2 = redis.call('lindex', KEYS[2], 0);if firstThreadId2 == false then break;end; local timeout = tonumber(redis.call('zscore', KEYS[3], firstThreadId2));if timeout <= tonumber(ARGV[4]) then redis.call('zrem', KEYS[3], firstThreadId2); redis.call('lpop', KEYS[2]); else break;end; end;if (redis.call('exists', KEYS[1]) == 0) and ((redis.call('exists', KEYS[2]) == 0) or (redis.call('lindex', KEYS[2], 0) == ARGV[2])) then redis.call('lpop', KEYS[2]); redis.call('zrem', KEYS[3], ARGV[2]); redis.call('hset', KEYS[1], ARGV[2], 1); redis.call('pexpire', KEYS[1], ARGV[1]); return nil; end; if (redis.call('hexists', KEYS[1], ARGV[2]) == 1) then redis.call('hincrby', KEYS[1], ARGV[2], 1); redis.call('pexpire', KEYS[1], ARGV[1]); return nil; end; local firstThreadId = redis.call('lindex', KEYS[2], 0); local ttl; if firstThreadId ~= false and firstThreadId ~= ARGV[2] then ttl = tonumber(redis.call('zscore', KEYS[3], firstThreadId)) - tonumber(ARGV[4]);else ttl = redis.call('pttl', KEYS[1]);end; local timeout = ttl + tonumber(ARGV[3]);if redis.call('zadd', KEYS[3], timeout, ARGV[2]) == 1 then redis.call('rpush', KEYS[2], ARGV[2]);end; return ttl;", Arrays.asList(this.getName(), this.getThreadsQueueName(), this.getTimeoutSetName()), new Object[]{this.internalLockLeaseTime, this.getLockName(threadId), currentTime + threadWaitTime, currentTime});
	} else {
		throw new IllegalArgumentException();
	}
}上面逻辑俩个分支的lua脚本,command == RedisCommands.EVAL_LONG的逻辑:
参数分析:
KEYS[1] = getName(): 锁的名字,anyLockKEYS[2] = hreadsQueueName = redisson_lock_queue:{anyLock}: 基于redis的数据结构实现的一个队列KEYS[3] = timeoutSetName = redisson_lock_timeout:{anyLock}: 基于redis的数据结构实现的一个ZSet有序集合,可以自动按照你给每个数据指定的一个分数(score)来进行排序ARGV[1]= 30000毫秒ARGV[2]= UUID:threadIdARGV[3]= 当前时间+ 5000毫秒ARGV[4]= 当前时间
"while true " +
"do " +
"    local firstThreadId2 = redis.call('lindex', KEYS[2], 0);" +
"    if firstThreadId2 == false " +
"    then " +
"        break;" +
"    end; " +
"    local timeout = tonumber(redis.call('zscore', KEYS[3], firstThreadId2));" +
"    if timeout <= tonumber(ARGV[4]) " +
"    then " +
"        redis.call('zrem', KEYS[3], firstThreadId2); " +
"        redis.call('lpop', KEYS[2]); " +
"    else " +
"        break;" +
"    end; " +
" end;" +
"if (redis.call('exists', KEYS[1]) == 0) and ((redis.call('exists', KEYS[2]) == 0) " +
"or (redis.call('lindex', KEYS[2], 0) == ARGV[2])) then redis.call('lpop', KEYS[2]); " +
"        redis.call('zrem', KEYS[3], ARGV[2]); " +
"        redis.call('hset', KEYS[1], ARGV[2], 1); " +
"        redis.call('pexpire', KEYS[1], ARGV[1]); " +
"        return nil; " +
"    end; " +
"    if (redis.call('hexists', KEYS[1], ARGV[2]) == 1) " +
"    then " +
"        redis.call('hincrby', KEYS[1], ARGV[2], 1); " +
"        redis.call('pexpire', KEYS[1], ARGV[1]); " +
"        return nil; " +
"    end; " +
"    local firstThreadId = redis.call('lindex', KEYS[2], 0); " +
"    local ttl; " +
"    if firstThreadId ~= false and firstThreadId ~= ARGV[2] " +
"    then " +
"        ttl = tonumber(redis.call('zscore', KEYS[3], firstThreadId)) - tonumber(ARGV[4]);" +
"    else " +
"        ttl = redis.call('pttl', KEYS[1]);" +
"    end; " +
"    local timeout = ttl + tonumber(ARGV[3]);" +
"    if redis.call('zadd', KEYS[3], timeout, ARGV[2]) == 1 " +
"    then " +
"        redis.call('rpush', KEYS[2], ARGV[2]);" +
"    end; " +
"    return ttl;";
先从队列
KEYS[2]中弹出来第一个元素:- 队列
KEYS[2]是空的,所以什么都获取不到,此时就会直接退出while true死循环。
- 队列
队列
KEYS[2]不空的,取出队列KEYS[2]中第一个元素,在排序集合KEYS[3]中的过期时间,判断过期时间是否小于当前时间:- 不小于,没过期,退出while true死循环。
- 小于,过期了,删除过期节点后,死循环继续判断下一个节点是否过期。
判断锁
KEYS[1]不存在并且(队列KEYS[2]不存在或者当前线程是队列KEYS[2]的第一个元素)- 弹出第一个元素
ARGV[2](也就是自己),删除排序集合KEYS[3]中信息,设置锁KEYS[1]的拥有者,并设置过期时间。
- 弹出第一个元素
判断锁
KEYS[1]的拥有者是不是自己,如果是自己就锁的重入次数+1并延长过期时间。到这一步说明锁存在,但是不是自己是拥有者,继续判断自己是不是队列
KEYS[2]的第一个元素:- 不是,过期时间 = 第一个元素的过期时间 - 当前时间 + 当前时间 + 5000毫秒
- 是,过期时间 = 锁
KEYS[1]的过期时间 + 当前时间+ 5000毫秒 = 当前时间+锁KEYS[1]的过期时间+ 5000毫秒
1.4.7 联锁和红锁
需要准备多台redis实例,这些redis实例指的是完全互相独立的Redis节点,这些节点之间既没有主从,也没有集群关系。
联锁:指每台redis实例都要加锁成功,才是算加锁成功,有一台加锁失败,就加锁失败。(鸡肋不推荐使用)
public void tryMultiLock(){
	RLock lock01 = redissonClient01.getLock("lock");// 获取一把锁
	RLock lock02 = redissonClient02.getLock("lock");// 获取一把锁
	RLock lock03 = redissonClient03.getLock("lock");// 获取一把锁
	RedissonMultiLock redissonMultiLock = new RedissonMultiLock(lock01, lock02, lock03);
	redissonMultiLock.lock(); // 加锁
	try {
		// 业务逻辑
	} finally {
		redissonMultiLock.unlock(); // 解锁
	}
}
红锁:指半数以上的edis实例加锁成功,就算加锁成功。
public void tryRedLock(){
	RLock lock01 = redissonClient01.getLock("lock");// 获取一把锁
	RLock lock02 = redissonClient02.getLock("lock");// 获取一把锁
	RLock lock03 = redissonClient03.getLock("lock");// 获取一把锁
	RedissonRedLock redissonRedLock = new RedissonRedLock(lock01, lock02, lock03);
	redissonRedLock.lock(); // 加锁
	try {
		// 业务逻辑
	} finally {
		redissonRedLock.unlock(); // 解锁
	}
}
RedissonRedLock红锁继承自RedissonMultiLock联锁:
public class RedissonRedLock extends RedissonMultiLock {
    public RedissonRedLock(RLock... locks) {
        super(locks);
    }

    protected int failedLocksLimit() {
        return this.locks.size() - this.minLocksAmount(this.locks);
    }

    protected int minLocksAmount(List<RLock> locks) {
        return locks.size() / 2 + 1;
    }

    public void unlock() {
        this.unlockInner(this.locks);
    }

    protected boolean isLockFailed(Future<Boolean> future) {
        return false;
    }

    protected boolean isAllLocksAcquired(AtomicReference<RLock> lockedLockHolder, AtomicReference<Throwable> failed, Queue<RLock> lockedLocks) {
        return lockedLockHolder.get() == null && failed.get() == null || lockedLocks.size() >= this.minLocksAmount(this.locks);
    }
}RedissonRedLock的加锁、解锁代码都是使用RedissonMultiLock中的方法,只是其重写了一些方法,如failedLocksLimit方法定义允许失败的个数:
RedissonRedLock的failedLocksLimit方法:
protected int failedLocksLimit() {
	return this.locks.size() - this.minLocksAmount(this.locks); // 总数 - 半数以上 = 失败数
}
protected int minLocksAmount(List<RLock> locks) {
	return locks.size() / 2 + 1; // 半数以上
}RedissonMultiLock的failedLocksLimit方法:
 protected int failedLocksLimit() {
        return 0;
}
接下来,我们以tryLock()方法为例,详细分析红锁是如何加锁的,具体代码如下:
public void lock() {
	try {
		this.lockInterruptibly();
	} catch (InterruptedException var2) {
		Thread.currentThread().interrupt();
	}

}
public void lockInterruptibly() throws InterruptedException {
	 this.lockInterruptibly(-1L, (TimeUnit)null);
}跟进this.lockInterruptibly(-1L, (TimeUnit)null);方法:
public void lockInterruptibly(long leaseTime, TimeUnit unit) throws InterruptedException {
	long waitTime = -1L;
	if (leaseTime == -1L) { // 未设置过期时间
		waitTime = 5L; // 默认等待时间
		unit = TimeUnit.SECONDS; // 默认时间单位 秒
	} else {
		waitTime = unit.toMillis(leaseTime); // 设置过期时间 转换为 等待时间
		if (waitTime <= 2000L) {
			waitTime = 2000L;
		} else if (waitTime <= 5000L) {  // 计算等待时间
			waitTime = ThreadLocalRandom.current().nextLong(waitTime / 2L, waitTime);
		} else {
			waitTime = ThreadLocalRandom.current().nextLong(5000L, waitTime);
		}

		waitTime = unit.convert(waitTime, TimeUnit.MILLISECONDS);
	}

	while(!this.tryLock(waitTime, leaseTime, unit)) { // 重点获取锁
	}

}跟进this.tryLock(waitTime, leaseTime, unit)方法:
public boolean tryLock(long waitTime, long leaseTime, TimeUnit unit) throws InterruptedException {
	long newLeaseTime = -1L;
	if (leaseTime != -1L) {
		newLeaseTime = waitTime * 2L;
	}

	long time = System.currentTimeMillis();
	long remainTime = -1L;
	if (waitTime != -1L) {
		remainTime = unit.toMillis(waitTime);
	}

	int failedLocksLimit = this.failedLocksLimit(); // 获取允许失败的个数,上面提过
	List<RLock> lockedLocks = new ArrayList(this.locks.size());
	ListIterator iterator = this.locks.listIterator();

	while(iterator.hasNext()) { // 遍历加锁
		RLock lock = (RLock)iterator.next();

		boolean lockAcquired;
		try {
			if (waitTime == -1L && leaseTime == -1L) {
				lockAcquired = lock.tryLock(); // 加锁
			} else {
                // 指定了超时时间的情况,重新计算获取锁的等待时间
				long awaitTime = unit.convert(remainTime, TimeUnit.MILLISECONDS);
                // 调用tryLock()尝试加锁
				lockAcquired = lock.tryLock(awaitTime, newLeaseTime, unit);
			}
		} catch (Exception var19) {
            //  如果抛出,为了防止加锁成功,但是响应失败,需要解锁
			lockAcquired = false;
		}

		if (lockAcquired) {  // 加锁成功保存在lockedLocks集合中
			lockedLocks.add(lock);
		} else {
			if (this.locks.size() - lockedLocks.size() == this.failedLocksLimit()) {
				break; // 加锁失败判断,失败的个数是否到达了,最大允许的失败个数
			}

			if (failedLocksLimit == 0) {
				this.unlockInner(lockedLocks);
				if (waitTime == -1L && leaseTime == -1L) {
					return false;
				}

				failedLocksLimit = this.failedLocksLimit();
				lockedLocks.clear();

				while(iterator.hasPrevious()) {
					iterator.previous();
				}
			} else {
				--failedLocksLimit;
			}
		}

		if (remainTime != -1L) {
            // 锁剩余时间,这个时间是某个客户端向所有redis节点申请获取锁的总等待时间
			remainTime -= System.currentTimeMillis() - time;
            //  重置time为当前时间,因为下一次循环的时候,方便计算下一个redis节点获取锁消耗的时间
			time = System.currentTimeMillis();
			if (remainTime <= 0L) {
				this.unlockInner(lockedLocks); // 解锁已经加锁成功的
                // 等待超时,直接返回false,获取锁失败
				return false;
			}
		}
	}

	if (leaseTime != -1L) {
		List<RFuture<Boolean>> futures = new ArrayList(lockedLocks.size());
		Iterator i$ = lockedLocks.iterator();

		while(i$.hasNext()) { // 重置锁过期时间
			RLock rLock = (RLock)i$.next();
			RFuture<Boolean> future = rLock.expireAsync(unit.toMillis(leaseTime), TimeUnit.MILLISECONDS);
			futures.add(future);
		}

		i$ = futures.iterator();

		while(i$.hasNext()) {
			RFuture<Boolean> rFuture = (RFuture)i$.next();
			rFuture.syncUninterruptibly();
		}
	}

	return true;
}从源码中可以看到,红锁的加锁,其实就是循环所有加锁的节点,挨个执行LUA脚本加锁,对于加锁成功的那些节点,会加入到acquiredLocks集合中保存起来;如果加锁失败的话,则会判断已经申请锁失败的节点是否已经到达允许加锁失败节点个数限制 (N-(N/2+1)), 如果已经到达,就认定最终申请锁失败,则没有必要继续从后面的节点申请了。
并且,每个节点执行完tryLock()尝试获取锁之后,无论是否获取锁成功,都会判断目前从各个节点获取锁已经消耗的总时间,如果已经等于最大等待时间,则认定最终申请锁失败,需要对成功加锁集合 acquiredLocks 中的所有锁执行锁释放,然后返回false。
RedLock算法问题
①,持久化问题:假设一共有5个Redis节点:A, B, C, D, E:客户端1成功锁住了A, B, C,获取锁成功,但D和E没有锁住。节点C崩溃重启了,但客户端1在C上加的锁没有持久化下来,丢失了。节点C重启后,客户端2锁住了C, D, E,获取锁成功。这样,客户端1和客户端2同时获得了锁(针对同一资源)。
②,客户端长时间阻塞,导致获得的锁释放,访问的共享资源不受保护的问题。
③,Redlock算法对时钟依赖性太强, 若某个节点中发生时间跳跃(系统时间戳不正确),也可能会引此而引发锁安全性问题
④,红锁其实也并不能解决根本问题,只是降低问题发生的概率。完全相互独立的redis,每一台至少也要保证高可用,还是会有主从节点。既然有主从节点,在持续的高并发下,master还是可能会宕机,从节点可能还没来得及同步锁的数据。很有可能多个主节点也发生这样的情况,那么问题还是回到一开始的问题,红锁只是降低了发生的概率。其实,在实际场景中,红锁是很少使用的。这是因为使用了红锁后会影响高并发环境下的性能,使得程序的体验更差。所以,在实际场景中,我们一般都是要保证Redis集群的可靠性。同时,使用红锁后,当加锁成功的RLock个数不超过总数的一半时,会返回加锁失败,即使在业务层面任务加锁成功了,但是红锁也会返回加锁失败的结果。另外,使用红锁时,需要提供多套Redis的主从部署架构,同时,这多套Redis主从架构中的Master节点必须都是独立的,相互之间没有任何数据交互。