一,如何创建IOC容器
1.1 有web.xml如何创建spring上线文的
在正常的SSM项目中,我们会在web.xml配置如下内容,通过ContextLoaderListener监听加载启动spring容器的。
<!-- 加载spring容器 -->
<context-param>
  <param-name>contextConfigLocation</param-name>
  <param-value>classpath:ApplicationContext.xml</param-value>
</context-param>
<listener>
  <listener-class>org.springframework.web.context.ContextLoaderListener</listener-class>
</listener>
ContextLoaderListener的继承关系如下:
public class ContextLoaderListener extends ContextLoader implements ServletContextListener {
    public ContextLoaderListener() {
    }

    public ContextLoaderListener(WebApplicationContext context) {
        super(context);
    }

    public void contextInitialized(ServletContextEvent event) {
        this.initWebApplicationContext(event.getServletContext());
    }

    public void contextDestroyed(ServletContextEvent event) {
        this.closeWebApplicationContext(event.getServletContext());
        ContextCleanupListener.cleanupAttributes(event.getServletContext());
    }
}ContextLoaderListener实现了Tomcat提供的ServletContextListener接口,ServletContextListener接口的作用就是监听application域的创建和销毁,创建会调用ServletContextListener接口的contextInitialized方法,销毁就会调用ServletContextListener接口contextDestroyed方法,所以一旦web项目启动,就会创建application域,会触发ContextLoaderListener中的contextInitialized方法,由上代码可以ContextLoaderListener的contextInitialized方法,会调用 this.initWebApplicationContext(event.getServletContext());方法,该方法是ContextLoaderListener继承ContextLoader的
public WebApplicationContext initWebApplicationContext(ServletContext servletContext) {
    	// servletContext代表application域,从application域获取ROOT_WEB_APPLICATION_CONTEXT_ATTRIBUTE属性值
        if (servletContext.getAttribute(WebApplicationContext.ROOT_WEB_APPLICATION_CONTEXT_ATTRIBUTE) != null) { // 不为空表示Spring的上下文已经创建完成了,这里抛出异常,Spring的上下文创建完成会存在application域中
            throw new IllegalStateException("Cannot initialize context because there is already a root application context present - check whether you have multiple ContextLoader* definitions in your web.xml!");
        } else {
            servletContext.log("Initializing Spring root WebApplicationContext");
            Log logger = LogFactory.getLog(ContextLoader.class);
            if (logger.isInfoEnabled()) {
                logger.info("Root WebApplicationContext: initialization started");
            }

            long startTime = System.currentTimeMillis();

            try {
                if (this.context == null) {
                    // 创建Spring的上下文ApplicationContext这时的IOC中并没有加载任何Bean
                    this.context = this.createWebApplicationContext(servletContext);
                }

                if (this.context instanceof ConfigurableWebApplicationContext) {
                    ConfigurableWebApplicationContext cwac = (ConfigurableWebApplicationContext)this.context;
                    if (!cwac.isActive()) {
                        if (cwac.getParent() == null) {
                            ApplicationContext parent = this.loadParentContext(servletContext);
                            cwac.setParent(parent);
                        }
						// 这一步是,解析web.xml配置的ApplicationContext.xml为IOC中加载Bean
                        this.configureAndRefreshWebApplicationContext(cwac, servletContext);
                    }
                }
				// 这一步是将创建的Spring上下文ApplicationContext存放在session中
                servletContext.setAttribute(WebApplicationContext.ROOT_WEB_APPLICATION_CONTEXT_ATTRIBUTE, this.context);
                ClassLoader ccl = Thread.currentThread().getContextClassLoader();
                if (ccl == ContextLoader.class.getClassLoader()) {
                    currentContext = this.context;
                } else if (ccl != null) {
                    currentContextPerThread.put(ccl, this.context);
                }

                if (logger.isInfoEnabled()) {
                    long elapsedTime = System.currentTimeMillis() - startTime;
                    logger.info("Root WebApplicationContext initialized in " + elapsedTime + " ms");
                }

                return this.context;
            } catch (Error | RuntimeException var8) {
                logger.error("Context initialization failed", var8);
                servletContext.setAttribute(WebApplicationContext.ROOT_WEB_APPLICATION_CONTEXT_ATTRIBUTE, var8);
                throw var8;
            }
        }
}跟进this.configureAndRefreshWebApplicationContext(cwac, servletContext);方法,看看是如何知道web.xml中配置ApplicationContext.xml位置的:
protected void configureAndRefreshWebApplicationContext(ConfigurableWebApplicationContext wac, ServletContext sc) {
	String configLocationParam;
	if (ObjectUtils.identityToString(wac).equals(wac.getId())) {
		configLocationParam = sc.getInitParameter("contextId");
		if (configLocationParam != null) {
			wac.setId(configLocationParam);
		} else {
			wac.setId(ConfigurableWebApplicationContext.APPLICATION_CONTEXT_ID_PREFIX + ObjectUtils.getDisplayString(sc.getContextPath()));
		}
	}

	wac.setServletContext(sc);
    // 获取web.xml中配置的param-name = contextConfigLocation值
	configLocationParam = sc.getInitParameter("contextConfigLocation");
	if (configLocationParam != null) {
		wac.setConfigLocation(configLocationParam);
	}

	ConfigurableEnvironment env = wac.getEnvironment();
	if (env instanceof ConfigurableWebEnvironment) {
		((ConfigurableWebEnvironment)env).initPropertySources(sc, (ServletConfig)null);
	}

	this.customizeContext(sc, wac);
	wac.refresh(); // 这是刷新容器,太经典了,这里就不说了可以看看springIoc的加载流程
}
2.2 SpringBoot项目如何创建Spring的上下文
我们看看SpringBoot如何创建Spring的上下文的,我们在学习spring的IOC时候,可能都会写如下代码:
public class Main {
    public static void main(String[] args) throws Exception {
        // 通过xml配置创建Spring的上下文
        ClassPathXmlApplicationContext ctx = new ClassPathXmlApplicationContext("classpath:bean.xml") ;
    }
}
不管SSM创建的WebApplicationContext,还是通过xml配置创建ClassPathXmlApplicationContext都是为了创建一个ApplicationContext上下文,只是使用的方式不通,当然SpringBoot也有自己的方式。
@SpringBootApplication
public class TestApplication {
    public static void main(String[] args) {
        SpringApplication.run(TestApplication.class, args);
    }
}跟进SpringApplication.run(TestApplication.class, args);方法:
public static ConfigurableApplicationContext run(Class<?> primarySource, String... args) {
	return run(new Class[]{primarySource}, args);
}
public static ConfigurableApplicationContext run(Class<?>[] primarySources, String[] args) {
	return (new SpringApplication(primarySources)).run(args);
}
2.2.1 new SpringApplication
SpringApplication.run方法可以分为2步,一步是创建SpringApplication,一步是运行SpringApplication的run方法,先看new SpringApplication(primarySources):
public SpringApplication(Class... primarySources) {
this((ResourceLoader)null, primarySources);
}
public SpringApplication(ResourceLoader resourceLoader, Class... primarySources) {
this.sources = new LinkedHashSet();
this.bannerMode = Mode.CONSOLE;
this.logStartupInfo = true;
this.addCommandLineProperties = true;
this.addConversionService = true;
this.headless = true;
this.registerShutdownHook = true;
this.additionalProfiles = Collections.emptySet();
this.isCustomEnvironment = false;
this.lazyInitialization = false;
this.applicationContextFactory = ApplicationContextFactory.DEFAULT;
this.applicationStartup = ApplicationStartup.DEFAULT;
this.resourceLoader = resourceLoader;
Assert.notNull(primarySources, "PrimarySources must not be null");
// 将启动类放入primarySources
this.primarySources = new LinkedHashSet(Arrays.asList(primarySources));
// 根据classpath下的类,推算当前web应用类型(webFlux, servlet)
this.webApplicationType = WebApplicationType.deduceFromClasspath();
this.bootstrapRegistryInitializers = this.getBootstrapRegistryInitializersFromSpringFactories();
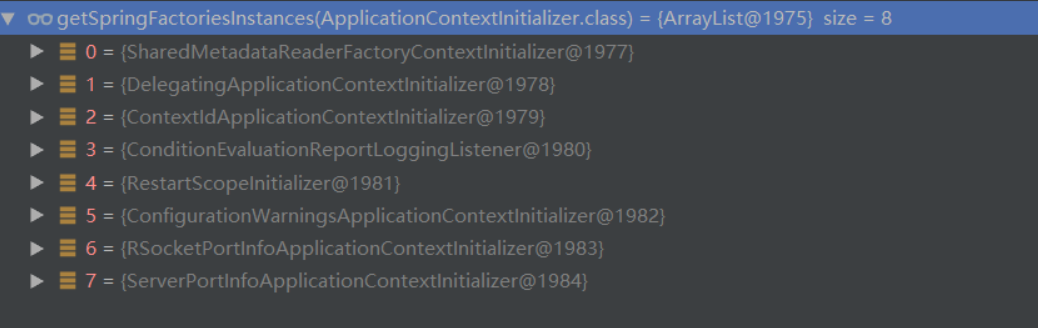
// 去spring.factories 中去获取所有key:org.springframework.context.ApplicationContextInitializer
this.setInitializers(this.getSpringFactoriesInstances(ApplicationContextInitializer.class));
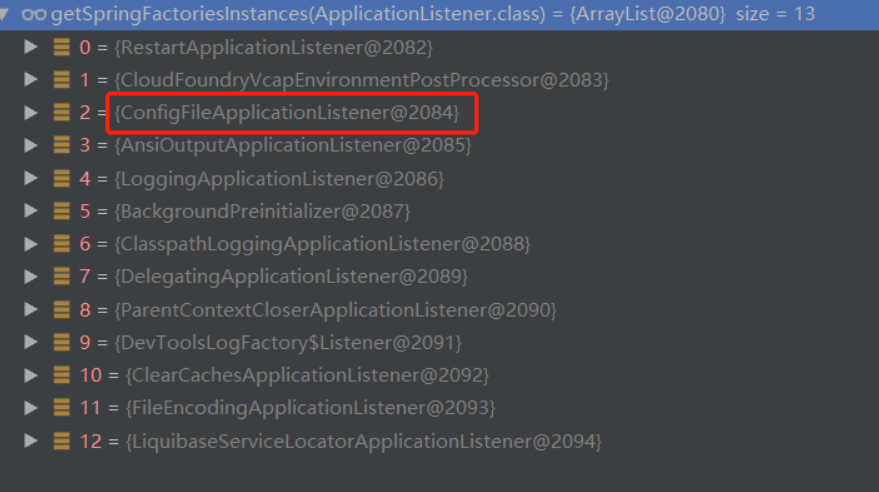
// 去spring.factories 中去获取所有key: org.springframework.context.ApplicationListener
this.setListeners(this.getSpringFactoriesInstances(ApplicationListener.class));
// 根据main方法推算出mainApplicationClass
this.mainApplicationClass = this.deduceMainApplicationClass();
}就看一看,根据classpath下的类,推算当前web应用类型(webFlux, servlet)的WebApplicationType.deduceFromClasspath():
static WebApplicationType deduceFromClasspath() {
    // 判断有没有DispatcherHandler
	if (ClassUtils.isPresent("org.springframework.web.reactive.DispatcherHandler", (ClassLoader)null) && !ClassUtils.isPresent("org.springframework.web.servlet.DispatcherServlet", (ClassLoader)null) && !ClassUtils.isPresent("org.glassfish.jersey.servlet.ServletContainer", (ClassLoader)null)) {
		return REACTIVE;
	} else {
		String[] var0 = SERVLET_INDICATOR_CLASSES;
		int var1 = var0.length;

		for(int var2 = 0; var2 < var1; ++var2) {
			String className = var0[var2];
			if (!ClassUtils.isPresent(className, (ClassLoader)null)) {
				return NONE;
			}
		}

		return SERVLET;
	}
}获取的org.springframework.context.ApplicationContextInitializer:
获取的org.springframework.context.ApplicationListener:
总结:
- 将启动类放入primarySources,启动类也是配置类。
- 根据classpath下的类,推算当前web应用类型,目的是方便后面根据类型创建不同类型的上下文。
- spring.factories读取了对外扩展的ApplicationContextInitializer ,ApplicationListener 对外扩展,对内解耦(比如全局配置文件、热部署插件),注意一下读取的ConfigFileApplicationListener监听器。
- 根据main推算出所在的类
2.2.2 运行run方法
SpringApplication对象创建完成后开始运行,跟进SpringApplication的润方法
public ConfigurableApplicationContext run(String... args) {
    // 计时
	StopWatch stopWatch = new StopWatch();
	stopWatch.start();
	DefaultBootstrapContext bootstrapContext = this.createBootstrapContext();
    // 它是任何spring上下文的接口, 所以可以接收任何ApplicationContext实现
	ConfigurableApplicationContext context = null;
	this.configureHeadlessProperty();
    // 去spring.factroies中读取了SpringApplicationRunListener的组件,EventPublishingRunListener就是用来发布事件或者运行监听器
	SpringApplicationRunListeners listeners = this.getRunListeners(args);
    // 发布ApplicationStartingEvent事件,启动事件监听
	listeners.starting(bootstrapContext, this.mainApplicationClass);

	try {
         // 根据命令行参数实例化一个ApplicationArguments
		ApplicationArguments applicationArguments = new DefaultApplicationArguments(args);
        // 标记①,预初始化环境:读取环境变量,读取配置文件信息(基于监听器)
		ConfigurableEnvironment environment = this.prepareEnvironment(listeners, bootstrapContext, applicationArguments);
        // 忽略beaninfo的bean
		this.configureIgnoreBeanInfo(environment);
        // 打印Banner 横幅
		Banner printedBanner = this.printBanner(environment);
        // 标记②,根据webApplicationType创建Spring上下文
		context = this.createApplicationContext();
		context.setApplicationStartup(this.applicationStartup);
        // 标记③,预初始化spring上下文
		this.prepareContext(bootstrapContext, context, environment, listeners, applicationArguments, printedBanner);
         // 加载spring ioc 容器相当重要,由于是使用AnnotationConfigServletWebServerApplicationContext启动的spring容器所以springboot对它做了扩展:加载自动配置类:invokeBeanFactoryPostProcessors ,创建servlet容器onRefresh
        // 标记④,刷新容器
		this.refreshContext(context);
		this.afterRefresh(context, applicationArguments);
		stopWatch.stop();
		if (this.logStartupInfo) {
			(new StartupInfoLogger(this.mainApplicationClass)).logStarted(this.getApplicationLog(), stopWatch);
		}

		listeners.started(context);
		this.callRunners(context, applicationArguments);
	} catch (Throwable var10) {
		this.handleRunFailure(context, var10, listeners);
		throw new IllegalStateException(var10);
	}

	try {
		listeners.running(context);
		return context;
	} catch (Throwable var9) {
		this.handleRunFailure(context, var9, (SpringApplicationRunListeners)null);
		throw new IllegalStateException(var9);
	}
}
标记①,预初始化环境:读取环境变量,读取配置文件信息
跟进this.prepareEnvironment(listeners, bootstrapContext, applicationArguments);方法:
private ConfigurableEnvironment prepareEnvironment(SpringApplicationRunListeners listeners, DefaultBootstrapContext bootstrapContext, ApplicationArguments applicationArguments) {
    // 根据webApplicationType创建Environment创建就会读取: java环境变量和系统环境变量
	ConfigurableEnvironment environment = this.getOrCreateEnvironment();
    // 将命令行参数读取环境变量中
	this.configureEnvironment((ConfigurableEnvironment)environment, applicationArguments.getSourceArgs());
    // 将@PropertieSource的配置信息 放在第一位, 因为读取配置文件@PropertieSource优先级是最低的
	ConfigurationPropertySources.attach((Environment)environment);
    // 发布了ApplicationEnvironmentPreparedEvent事件 读取了全局配置文件
	listeners.environmentPrepared(bootstrapContext, (ConfigurableEnvironment)environment);
    // 将所有spring.main 开头的配置信息绑定SpringApplication
	DefaultPropertiesPropertySource.moveToEnd((ConfigurableEnvironment)environment);
	Assert.state(!((ConfigurableEnvironment)environment).containsProperty("spring.main.environment-prefix"), "Environment prefix cannot be set via properties.");
	this.bindToSpringApplication((ConfigurableEnvironment)environment);
	if (!this.isCustomEnvironment) {
		environment = this.convertEnvironment((ConfigurableEnvironment)environment);
	}

	ConfigurationPropertySources.attach((Environment)environment);
	return (ConfigurableEnvironment)environment;
}发布了ApplicationEnvironmentPreparedEvent事件,跟进listeners.environmentPrepared(bootstrapContext, (ConfigurableEnvironment)environment);方法:
void environmentPrepared(ConfigurableBootstrapContext bootstrapContext, ConfigurableEnvironment environment) {
	this.doWithListeners("spring.boot.application.environment-prepared", (listener) -> {
		listener.environmentPrepared(bootstrapContext, environment);
	});
}继续跟进listener.environmentPrepared(bootstrapContext, environment);方法:
public void environmentPrepared(ConfigurableBootstrapContext bootstrapContext, ConfigurableEnvironment environment) {
    // 发布了ApplicationEnvironmentPreparedEvent事件
	this.initialMulticaster.multicastEvent(new ApplicationEnvironmentPreparedEvent(bootstrapContext, this.application, this.args, environment));
}
发布事件就会有人监听事件,刚好我们在创建SpringApplication的时候,从spring.factroies中加载的ConfigFileApplicationListener就是解析配置文件。
public class ConfigFileApplicationListener implements EnvironmentPostProcessor, SmartApplicationListener, Ordered {
    // 默认配置文件存放位置
    private static final String DEFAULT_SEARCH_LOCATIONS = "classpath:/,classpath:/config/,file:./,file:./config/*/,file:./config/";
 }
ConfigFileApplicationListener实现了SmartApplicationListener接口,SmartApplicationListener接口,继承ApplicationListener,监听ApplicationEvent事件,发布了ApplicationEnvironmentPreparedEvent事件是ApplicationEvent子类。
public interface SmartApplicationListener extends ApplicationListener<ApplicationEvent>, Ordered {
    // .....
}
标记②,根据webApplicationType创建Spring上下文
跟进context = this.createApplicationContext();方法:
protected ConfigurableApplicationContext createApplicationContext() {
   Class<?> contextClass = this.applicationContextClass;
   if (contextClass == null) {
      try {
         switch (this.webApplicationType) { // 在创建SpringApplication是以确定
         case SERVLET:
            //应用为servlet类型的web应用
            contextClass = Class.forName(DEFAULT_SERVLET_WEB_CONTEXT_CLASS);
            break;
         case REACTIVE:
            //应用为响应式web应用
            contextClass = Class.forName(DEFAULT_REACTIVE_WEB_CONTEXT_CLASS);
            break;
         default:
            //应用为非web类型的应用
            contextClass = Class.forName(DEFAULT_CONTEXT_CLASS);
         }
      }
      catch (ClassNotFoundException ex) {
         throw new IllegalStateException(
               "Unable create a default ApplicationContext, "
                     + "please specify an ApplicationContextClass",
               ex);
      }
   }
    // 调用instantiateClass根据反射创建
   return (ConfigurableApplicationContext) BeanUtils.instantiateClass(contextClass);
}
标记③,预初始化spring上下文
跟进this.prepareContext(bootstrapContext, context, environment, listeners, applicationArguments, printedBanner);方法:
private void prepareContext(DefaultBootstrapContext bootstrapContext, ConfigurableApplicationContext context, ConfigurableEnvironment environment, SpringApplicationRunListeners listeners, ApplicationArguments applicationArguments, Banner printedBanner) {
	context.setEnvironment(environment);
	this.postProcessApplicationContext(context);
    // 拿到在创建SpringApplication时去spring.factories读取到所有ApplicationContextInitializer的组件,循环调用initialize方法
	this.applyInitializers(context);
    // 发布了ApplicationContextInitializedEvent事件
	listeners.contextPrepared(context);
	bootstrapContext.close(context);
	if (this.logStartupInfo) {
		this.logStartupInfo(context.getParent() == null);
		this.logStartupProfileInfo(context);
	}
	// 获取当前spring上下文beanFactory (负责创建bean)
	ConfigurableListableBeanFactory beanFactory = context.getBeanFactory();
	beanFactory.registerSingleton("springApplicationArguments", applicationArguments);
	if (printedBanner != null) {
		beanFactory.registerSingleton("springBootBanner", printedBanner);
	}
	// 在Spring下 如果出现2个重名的bean, 则后读取到的会覆盖前面
    // 在SpringBoot 在这里设置了不允许覆盖, 当出现2个重名的bean 会抛出异常
	if (beanFactory instanceof DefaultListableBeanFactory) {
		((DefaultListableBeanFactory)beanFactory).setAllowBeanDefinitionOverriding(this.allowBeanDefinitionOverriding);
	}
	// 设置当前spring容器是不是要将所有的bean设置为懒加载
	if (this.lazyInitialization) {
		context.addBeanFactoryPostProcessor(new LazyInitializationBeanFactoryPostProcessor());
	}
	Set<Object> sources = this.getAllSources();
	Assert.notEmpty(sources, "Sources must not be empty");
    // 读取主启动类,将它注册为BD、就像我们以前register(启动类);一个意思 (因为后续要根据配置类解析配置的所有bean)
	this.load(context, sources.toArray(new Object[0]));
    // 读取完配置类后发送ApplicationPreparedEvent事件
	listeners.contextLoaded(context);
}
标记④,刷新容器
跟进this.refreshContext(context);
private void refreshContext(ConfigurableApplicationContext context) {
	if (this.registerShutdownHook) {
		shutdownHook.registerApplicationContext(context);
	}
	this.refresh(context); // 继续跟进
}跟进this.refresh(context);方法:
protected void refresh(ConfigurableApplicationContext applicationContext) {
	applicationContext.refresh();
}然后跟进org.springframework.boot.web.servlet.context.ServletWebServerApplicationContext#refresh方法
public final void refresh() throws BeansException, IllegalStateException {
	try {
		super.refresh();
	} catch (RuntimeException var3) {
		WebServer webServer = this.webServer;
		if (webServer != null) {
			webServer.stop(); // 停止webServer
		}

		throw var3;
	}
}接着调用org.springframework.context.support.AbstractApplicationContext#refresh父类的
public void refresh() throws BeansException, IllegalStateException {
	synchronized(this.startupShutdownMonitor) {
		StartupStep contextRefresh = this.applicationStartup.start("spring.context.refresh");
		this.prepareRefresh();
		ConfigurableListableBeanFactory beanFactory = this.obtainFreshBeanFactory();
		this.prepareBeanFactory(beanFactory);

		try {
			this.postProcessBeanFactory(beanFactory);
			StartupStep beanPostProcess = this.applicationStartup.start("spring.context.beans.post-process");
			this.invokeBeanFactoryPostProcessors(beanFactory);
			this.registerBeanPostProcessors(beanFactory);
			beanPostProcess.end();
			this.initMessageSource();
			this.initApplicationEventMulticaster();
			this.onRefresh();
			this.registerListeners();
			this.finishBeanFactoryInitialization(beanFactory);
			this.finishRefresh();
		} catch (BeansException var10) {
			if (this.logger.isWarnEnabled()) {
				this.logger.warn("Exception encountered during context initialization - cancelling refresh attempt: " + var10);
			}

			this.destroyBeans();
			this.cancelRefresh(var10);
			throw var10;
		} finally {
			this.resetCommonCaches();
			contextRefresh.end();
		}

	}
}这个this.onRefresh();方法内有内嵌tomcat的创建过程。
二,jar包的方式启动
得益于SpringBoot的封装,我们可以只通过jar -jar一行命令便启动一个web项目。再也不用操心搭建tomcat等相关web容器。那么,你是否探究过SpringBoot是如何达到这一操作的呢?只有了解了底层实现原理,才能更好的掌握该项技术带来的好处以及性能调优。本篇文章带大家聊一探究竟。
java -jar做了什么?
先要弄清楚java -jar命令做了什么,在oracle官网找到了该命令的描述: 使用-jar参数时,后面的参数是的jar文件名,该jar文件中包含的是class和资源文件;在MANIFEST.MF文件中有Main-Class的定义;Main-Class的源码中指定了整个应用的启动类;
在解压后的jar包的META-INF文件夹中确实有MANIFEST.MF文件,内容如下:
Manifest-Version: 1.0
Spring-Boot-Classpath-Index: BOOT-INF/classpath.idx
Implementation-Title: test
Implementation-Version: 0.0.1-SNAPSHOT
Spring-Boot-Layers-Index: BOOT-INF/layers.idx
Start-Class: top.zouyh.test.TestApplication
Spring-Boot-Classes: BOOT-INF/classes/
Spring-Boot-Lib: BOOT-INF/lib/
Build-Jdk-Spec: 1.8
Spring-Boot-Version: 2.5.13
Created-By: Maven JAR Plugin 3.2.2
Main-Class: org.springframework.boot.loader.JarLauncher
疑惑的是Main-Class启动类不是SpringBoot项目的启动类,那问题就来了,从理论上看,执行java -jar命令时org.springframework.boot.loader.JarLauncher类会被执行,但实际上是top.zouyh.test.TestApplication被执行了,这其中发生了什么呢?为什么要这么做呢?
主要原因是:Java没有提供任何标准的方式来加载嵌套的jar文件,就是加载jar中的jar的方式的,为了解决这一问题,很多开发人员采用shaded(着色) jars,但是这种方式会有一些问题, shaded jars的问题在于,很难查看应用程序中实际包含哪些库。 如果在多个jar中使用相同的文件名(但具有不同的内容),也可能会产生问题,Spring Boot采用了另一种方法,实际上允许您直接嵌套jar(fatJar)。
那我们就看一看,SpringBoot如何加载嵌套的jar文件且不会有shaded(着色) jars的问题。
2.1 打包
Spring Boot项目的pom.xml文件中默认使用如下插件进行打包:
<build>
    <plugins>
        <plugin>
            <groupId>org.springframework.boot</groupId>
            <artifactId>spring-boot-maven-plugin</artifactId>
        </plugin>
    </plugins>
</build>
执行maven clean package之后,会生成两个文件:
test-0.0.1-SNAPSHOT.jar
test-0.0.1-SNAPSHOT.jar.originalspring-boot-maven-plugin项目存在于spring-boot-tools目录中。spring-boot-maven-plugin的repackage,在代码层面调用了将执行到org.springframework.boot.maven.RepackageMojo#execute,该方法的主要逻辑是调用了org.springframework.boot.maven.RepackageMojo#repackage:
private void repackage() throws MojoExecutionException {
   // maven生成的jar,最终的命名将加上.original后缀
   Artifact source = getSourceArtifact();
   // 最终为可执行jar,即fat jar
   File target = getTargetFile();
   // 获取重新打包器,将maven生成的jar重新打包成可执行jar
   Repackager repackager = getRepackager(source.getFile());
   // 查找并过滤项目运行时依赖的jar
   Set<Artifact> artifacts = filterDependencies(this.project.getArtifacts(),
         getFilters(getAdditionalFilters()));
   // 将artifacts转换成libraries
   Libraries libraries = new ArtifactsLibraries(artifacts, this.requiresUnpack,
         getLog());
   try {
      // 获得Spring Boot启动脚本
      LaunchScript launchScript = getLaunchScript();
      // 执行重新打包,生成fat jar
      repackager.repackage(target, libraries, launchScript);
   }catch (IOException ex) {
      throw new MojoExecutionException(ex.getMessage(), ex);
   }
   // 将maven生成的jar更新成.original文件
   updateArtifact(source, target, repackager.getBackupFile());
}继续跟踪getRepackager(source.getFile());这个方法,知道Repackager是如何生成的,也就大致能够推测出内在的打包逻辑。
private Repackager getRepackager(File source) {
	 Repackager repackager = new Repackager(source, this.layoutFactory);
	 repackager.addMainClassTimeoutWarningListener(new LoggingMainClassTimeoutWarningListener());
	 // 设置main class的名称,如果不指定的话则会查找第一个包含main方法的类,
	 // repacke 最后将会设置org.springframework.boot.loader.JarLauncher
	 repackager.setMainClass(this.mainClass);
	 if (this.layout != null) {
		 getLog().info("Layout: " + this.layout);
		 repackager.setLayout(this.layout.layout());
	 }
	 return repackager;
}repackager.setLayout(this.layout.layout());设置了文件布局,或者目录布局, this.layout.layout()方法的返回对象是org.springframework.boot.loader.tools.Layouts.Jar:
public static class Jar implements RepackagingLayout {
	@Override
	public String getLauncherClassName() {
		return "org.springframework.boot.loader.JarLauncher";
	}
	@Override
	public String getLibraryDestination(String libraryName, LibraryScope scope) {
		return "BOOT-INF/lib/";
	}
	@Override
	public String getClassesLocation() {
		return "";
	}
	@Override
	public String getRepackagedClassesLocation() {
		return "BOOT-INF/classes/";
	}
	@Override
	public boolean isExecutable() {
		return true;
	}
}
首先来看看jar的目录结构,都包含哪些目录和文件,解压jar包可以看到如下结构:
spring-boot-learn-0.0.1-SNAPSHOT
├── META-INF
│   └── MANIFEST.MF和maven的构建信息
├── BOOT-INF
│   ├── classes
│   │   └── 用户应用程序启动类/ springboot项目启动类
│   └── lib
│       └── 第三方依赖jar
└── org
    └── springframework
        └── boot
            └── loader
                └── springboot程序启动
MANIFEST.MF 文件的Main-Class属性org.springframework.boot.loader.JarLauncher了,看来我们的下面的重点就是研究一下这个JarLauncher,org.springframework.boot.loader.JarLauncher类是在spring-boot-loader中的,关于spring-boot-loader,spring boot的github上是这样介绍的:Spring Boot Loader提供了秘密工具,可让您构建可以使用java -jar启动的单个jar文件。通常,您不需要直接使用spring-boot-loader,而可以使用Gradle或Maven插件。
2.2 运行
若想在IDEA中来看源码,需要在pom文件中引入如下配置:
<dependency>
     <groupid>org.springframework.boot</groupid>
     <artifactid>spring-boot-loader</artifactid>
     <scope>provided</scope>
</dependency>找到org.springframework.boot.loader.JarLauncher类:
public class JarLauncher extends ExecutableArchiveLauncher {
	// BOOT-INF/classes/
	static final String BOOT_INF_CLASSES = "BOOT-INF/classes/";
	// BOOT-INF/lib/
	static final String BOOT_INF_LIB = "BOOT-INF/lib/";
	public JarLauncher() {
	}
	protected JarLauncher(Archive archive) {
		super(archive);
	}
	@Override
	protected boolean isNestedArchive(Archive.Entry entry) {
		if (entry.isDirectory()) {
			return entry.getName().equals(BOOT_INF_CLASSES);
		}
		return entry.getName().startsWith(BOOT_INF_LIB);
	}
	// main方法
	public static void main(String[] args) throws Exception {
		new JarLauncher().launch(args);
	}

}
可以发现,JarLauncher定义了BOOT_INF_CLASSES和BOOT_INF_LIB两个常量,正好就是前面我们解压之后的两个文件目录。JarLauncher包含了一个main方法,作为应用的启动入口。
从 main 来看,只是构造了一个 JarLauncher对象,然后执行其 launch 方法, JarLauncher对象会调用父类ExecutableArchiveLauncher的构造方法:
public ExecutableArchiveLauncher() {
	try {
		// 构造 archive 对象
		this.archive = createArchive();
	}
	catch (Exception ex) {
		throw new IllegalStateException(ex);
	}

	// 构造 archive 对象
	protected final Archive createArchive() throws Exception {
        ProtectionDomain protectiOnDomain =  getClass().getProtectionDomain();
        CodeSource codeSource = protectionDomain.getCodeSource();
        URI location = (codeSource != null) & #63; codeSource.getLocation().toURI() : null;
        // 这里就是拿到当前的classpath 的绝对路径
        String path = (location != null) & #63; location.getSchemeSpecificPart() : null;
        if (path == null) {
            throw new IllegalStateException("Unable to determine code source archive");
        }
        File root = new File(path);
        if (!root.exists()) {
            throw new IllegalStateException("Unable to determine code source archive from " + root);
        }
        // 判断文件格式如果是文件夹创建ExplodedArchive,如果是jar包创建JarFileArchive
        return (root.isDirectory() & #63; new ExplodedArchive(root) : new JarFileArchive(root));
    }
}
构造archive 对象,这里有必要Archive相关的概念:archive即归档文件,这个概念在linux下比较常见,通常就是一个tar/zip格式的压缩包,jar是zip格式,SpringBoot抽象了Archive的概念,一个Archive可以是jar(JarFileArchive实现类),可以是一个文件目录(ExplodedArchive实现类),关于Spring Boot中Archive的源码如下:
public interface Archive extends Iterable<Archive.Entry> {
    // 获取该归档的url
    URL getUrl() throws MalformedURLException;
    // 获取jar!/META-INF/MANIFEST.MF或[ArchiveDir]/META-INF/MANIFEST.MF
    Manifest getManifest() throws IOException;
    // 获取jar!/BOOT-INF/lib/*.jar或[ArchiveDir]/BOOT-INF/lib/*.jar
    List<Archive> getNestedArchives(EntryFilter filter) throws IOException;
}SpringBoot定义了一个接口用于描述资源,也就是org.springframework.boot.loader.archive.Archive。该接口有两个实现,分别是org.springframework.boot.loader.archive.ExplodedArchive用于在文件夹目录下寻找资源和org.springframework.boot.loader.archive.JarFileArchive用于在jar包环境下寻找资源。
也就是说创建的archive 对象是为了加载jar包或者文件夹中的/BOOT-INF/lib下的文件
每个JarFileArchive都会对应一个JarFile,JarFile被构造的时候会解析内部结构,去获取jar包里的各个文件或文件夹,这些文件或文件夹会被封装到Entry中,也存储在JarFileArchive中。如果Entry是个jar,会解析成JarFileArchive。
比如一个JarFileArchive对应的URL为:
jar:file:/Users/format/Develop/gitrepository/springboot-analysis/springboot-executable-jar/target/executable-jar-1.0-SNAPSHOT.jar!/它对应的JarFile为:
/Users/format/Develop/gitrepository/springboot-analysis/springboot-executable-jar/target/executable-jar-1.0-SNAPSHOT.jar这个JarFile有很多Entry,比如:
META-INF/
META-INF/MANIFEST.MF
spring/
spring/study/
....
spring/study/executablejar/ExecutableJarApplication.class
lib/spring-boot-starter-1.3.5.RELEASE.jar
lib/spring-boot-1.3.5.RELEASE.jar
...
JarFileArchive内部的一些依赖jar对应的URL:
jar:file:/Users/Format/Develop/gitrepository/springboot-analysis/springboot-executable-jar/target/executable-jar-1.0-SNAPSHOT.jar!/lib/spring-boot-starter-web-1.3.5.RELEASE.jar!/jar:file:/Users/Format/Develop/gitrepository/springboot-analysis/springboot-executable-jar/target/executable-jar-1.0-SNAPSHOT.jar!/lib/spring-boot-loader-1.3.5.RELEASE.jar!/org/springframework/boot/loader/JarLauncher.class我们看到如果有jar包中包含jar,或者jar包中包含jar包里面的class文件,那么会使用 !/分隔开,这种方式只有org.springframework.boot.loader.jar.Handler能处理,它是SpringBoot内部扩展出来的一种URL协议。
JarLauncher构造完成后就该执行JarLauncher的launch方法了,这个方法定义在了父类的Launcher里:
protected void launch(String[] args) throws Exception {
	 /*
	 * 利用 java.net.URLStreamHandler的扩展机制注册了SpringBoot的自定义的可以解析嵌套jar的协议。
	 * 因为SpringBoot FatJar除包含传统Java Jar中的资源外还包含依赖的第三方Jar文件
	 * 当SpringBoot FatJar被java -jar命令引导时,其内部的Jar文件是无法被JDK的默认实现
	 * sun.net.www.protocol.jar.Handler当做classpath的,这就是SpringBoot的自定义协议的原因。
	 */
     //标记① 注册URL(jar)协议的处理器,主要是使用自定义的 URLStreamHandler处理器处理jar 包
	 JarFile.registerUrlProtocolHandler();
     // 标记②,getClassPathArchives方法
     // 标记③,createClassLoader方法
	 ClassLoader classLoader = createClassLoader(getClassPathArchives());
     // 标记④,launch方法
	 launch(args, getMainClass(), classLoader);
}标记①,URLStreamHandler
java中描述资源常使用URL。而URL有一个方法用于打开链接java.net.URL#openConnection()。由于URL用于表达各种各样的资源,打开资源的具体动作由java.net.URLStreamHandler这个类的子类来完成。根据不同的协议,会有不同的handler实现。而JDK内置了相当多的handler实现用于应对不同的协议。比如jar、file、http等等。URL内部有一个静态HashTable属性,用于保存已经被发现的协议和handler实例的映射。
获得URLStreamHandler有三种方法:
- 实现URLStreamHandlerFactory接口,通过方法URL.setURLStreamHandlerFactory设置。该属性是一个静态属性,且只能被设置一次。
- 直接提供URLStreamHandler的子类,作为URL的构造方法的入参之一。但是在JVM中有固定的规范要求:
子类的类名必须是Handler,同时最后一级的包名必须是协议的名称。比如自定义了Http的协议实现,则类名必然为xx.http.Handler;
JVM启动的时候,需要设置java.protocol.handler.pkgs系统属性,如果有多个实现类,那么中间用!/隔开。因为JVM在尝试寻找Handler时,会从这个属性中获取包名前缀,最终使用包名前缀.协议名.Handler,使用Class.forName方法尝试初始化类,如果初始化成功,则会使用该类的实现作为协议实现。
为了实现这个目标,SpringBoot首先从支持jar in jar中内容读取做了定制,也就是支持多个!/分隔符的url路径。SpringBoot定制了以下两个方面:
(1)实现了一个java.net.URLStreamHandler的子类org.springframework.boot.loader.jar.Handler。该Handler支持识别多个!/分隔符,并且正确的打开URLConnection。打开的Connection是SpringBoot定制的org.springframework.boot.loader.jar.JarURLConnection实现。
(2)实现了一个java.net.JarURLConnection的子类org.springframework.boot.loader.jar.JarURLConnection。该链接支持多个!/分隔符,并且自己实现了在这种情况下获取InputStream的方法。而为了能够在org.springframework.boot.loader.jar.JarURLConnection正确获取输入流,SpringBoot自定义了一套读取ZipFile的工具类和方法。这部分和ZIP压缩算法规范紧密相连,就不拓展了。
标记②,重点关注下createClassLoader(getClassPathArchives()) 构建ClassLoader的逻辑,首先调用getClassPathArchives()方法返回值作为参数,该方法为抽象方法,具体实现在子类ExecutableArchiveLauncher中:
@Override
protected List<archive> getClassPathArchives() throws Exception {
	 List<archive> archives = new ArrayList<>(this.archive.getNestedArchives(this::isNestedArchive));
	 postProcessClassPathArchives(archives);
	 return archives;
}
该方法会执行Archive接口定义的getNestedArchives方法,返回的与指定过滤器匹配的条目的嵌套存档列表。这里的archive其实就是JarFileArchive ,传入的过滤器是JarLauncher#isNestedArchive方法引用:
@Override
protected boolean isNestedArchive(Archive.Entry entry) {
	 // entry是文件目录时,必须是我们自己的业务类所在的目录 BOOT-INF/classes/
	 if (entry.isDirectory()) {
	 	return entry.getName().equals(BOOT_INF_CLASSES);
	 }
	 // entry是Jar文件时,需要在依赖的文件目录 BOOT-INF/lib/下面
	 return entry.getName().startsWith(BOOT_INF_LIB);
}
通过archive的getNestedArchives方法找到/BOOT-INF/lib下所有jar及/BOOT-INF/classes目录所对应的archive,所有应用程序类文件均可通过/BOOT-INF/classes加载,所有依赖的第三方jar均可通过/BOOT-INF/lib加载。
getClassPathArchives方法通过过滤器将BOOT-INF/classes/和BOOT-INF/lib/下的嵌套存档作为List返回参数传入createClassLoader方法中。解析标记③,createClassLoader方法:
protected ClassLoader createClassLoader(List<archive> archives) throws Exception {
	 List<url> urls = new ArrayList<>(archives.size());
	 for (Archive archive : archives) {
		// 前面说到,archive有一个自己的URL的,获得archive的URL放到list中
		urls.add(archive.getUrl());
	 }
	 return createClassLoader(urls.toArray(new URL[0]));
}继续跟进createClassLoader(urls.toArray(new URL[0]));方法:
protected ClassLoader createClassLoader(URL[] urls) throws Exception {
    // 创建了LaunchedURLClassLoader
 	return new LaunchedURLClassLoader(urls, getClass().getClassLoader());
}
下面重点看一下LaunchedURLClassLoader的构造过程:
public LaunchedURLClassLoader(URL[] urls, ClassLoader parent) {
 	super(urls, parent);
}
LaunchedURLClassLoader是spring boot自己定义的类加载器,继承了JDK的URLClassLoader并重写了loadClass方法,也就是说它修改了默认的类加载方式,定义了自己的类加载规则,可以从BOOT-INF/classes/和BOOT-INF/lib/加载依赖包的class文件了
LaunchedURLClassLoader创建完成后,我们回到launch方法中,下一步就是执行标记④launch(args, getMainClass(), classLoader); 方法,在执行launch方法之前,会调用getMainClass方法并将其返回值作为参数。getMainClass的实现在Launcher的子类ExecutableArchiveLauncher中:
protected String getMainClass() throws Exception {
	// 从 archive 中拿到 Manifest文件
	Manifest manifest = this.archive.getManifest();
	String mainClass = null;
	if (manifest != null) {
		// 就是MANIFEST.MF 文件中定义的Start-Class属性,也就是我们自己写的top.zouyh.test.TestApplication这个类
		mainClass = manifest.getMainAttributes().getValue("Start-Class");
	}
	if (mainClass == null) {
		throw new IllegalStateException("No 'Start-Class' manifest entry specified in " + this);
	}
	// 返回mainClass
	return mainClass;
}得到mainClass后,开始执行标记④launch(args, getMainClass(), classLoader); 方法:
protected void launch(String[] args, String mainClass, ClassLoader classLoader) throws Exception {
	 // 将自定义的LaunchedURLClassLoader设置为当前线程上下文类加载器
	 Thread.currentThread().setContextClassLoader(classLoader);
	 // 构建一个 MainMethodRunner 实例对象来 启动应用
	 createMainMethodRunner(mainClass, args, classLoader).run();
}跟进createMainMethodRunner(mainClass, args, classLoader).run();方法:
protected MainMethodRunner createMainMethodRunner(String mainClass, String[] args, ClassLoader classLoader) {
 	return new MainMethodRunner(mainClass, args);
}
MainMethodRunner对象构建完成后,调用它的run方法:
public void run() throws Exception {
	 // 使用当前线程上下文类加载器也就是自定义的LaunchedURLClassLoader来加载我们自己写的top.zouyh.test.TestApplication这个类
	 Class<&#63;> mainClass = Thread.currentThread().getContextClassLoader().loadClass(this.mainClassName);
	 // 找到TestApplication的main方法
	 Method mainMethod = mainClass.getDeclaredMethod("main", String[].class);
	 // 最后,通过反射的方式调用main方法
	 mainMethod.invoke(null, new Object[] { this.args });
}
至此,我们自己的main方法开始被调用,所有我们自己的应用程序类文件均可通过/BOOT-INF/classes加载,所有依赖的第三方jar均可通过/BOOT-INF/lib加载,然后就开始了spring boot的启动流程了。
总结一下Spring Boot应用的启动流程:
- Spring Boot应用打包之后,生成一个Fat jar,包含了应用依赖的jar包(BOOT-INF/classes/),应用的class文件(BOOT-INF/lib/)和Spring Boot loader相关的类。
- Fat jar的通过java -jar启动项目,是MANIFEST.MF运行JarLauncher的main方法,main方法中会创建一个LaunchedURLClassLoader来加载BOOT-INF/classes/下面的jar,并以一个新线程启动应用的Main函数。
那么,ClassLoader是如何读取到Resource,它又需要哪些能力?查找资源和读取资源的能力。对应的API:
LaunchedURLClassLoader.loadClassURL.getContent()URL.openConnection()Handler.openConnection(URL)
最终调用的是JarURLConnection的getInputStream()函数。
public InputStream getInputStream() throws IOException {
   connect();
   if (this.jarEntryName.isEmpty()) {
     throw new IOException("no entry name specified");
   }
   return this.jarEntryData.getInputStream();
 }
从一个URL,到最终读取到URL里的内容,整个过程是比较复杂的,总结下:
- Spring boot注册了一个Handler来处理”jar:”这种协议的URL。
- Spring boot扩展了JarFile和JarURLConnection,内部处理jar in jar的情况。
- 在处理多重jar in jar的URL时,Spring Boot会循环处理,并缓存已经加载到的JarFile。
- 对于多重jar in jar,实际上是解压到了临时目录来处理,可以参考JarFileArchive里的代码。
- 在获取URL的InputStream时,最终获取到的是JarFile里的JarEntryData。
扩展:在IDE/开放目录启动Spring boot应用,在上面只提到在一个fat jar里启动SpringBoot应用的过程,那么IDE里Spring boot是如何启动的呢?
在IDE里,直接运行的Main函数是应用的Main函数,其实在IDE里启动SpringBoot应用是最简单的一种情况,因为依赖的Jar都让IDE放到classpath里了,所以Spring boot直接启动就完事了。还有一种情况是在一个开放目录下启动SpringBoot启动。所谓的开放目录就是把fat jar解压,然后直接启动应用。这时,Spring boot会判断当前是否在一个目录里,如果是的,则构造一个ExplodedArchive(前面在jar里时是JarFileArchive),后面的启动流程类似fat jar的。