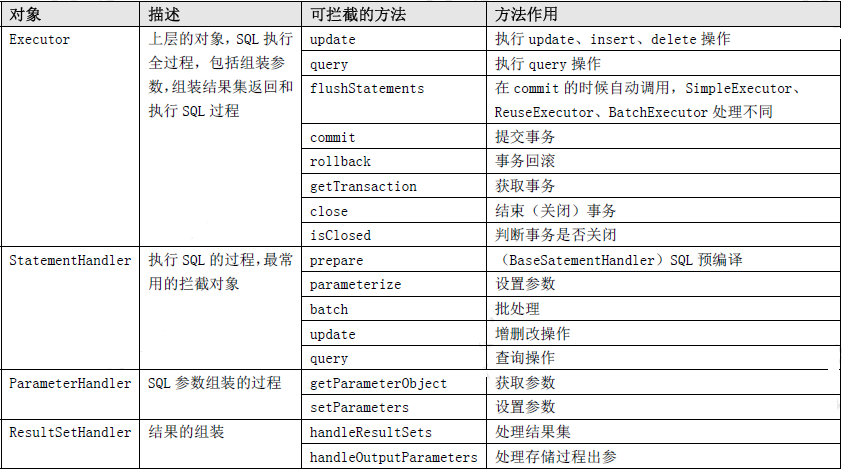
一,mybatis的插件
mybatis作为一个应用广泛的优秀的ORM开源框架,这个框架具有强大的灵活性,在四大组件(Executor、StatementHandler、ParameterHandler、ResultSetHandler)处提供了简单易用的插件扩展机制。Mybatis对持久层的操作就是借助于四大核心对象。MyBatis支持用插件对四大核心对象进行拦截,对mybatis来说插件就是拦截器,用来增强核心对象的功能,增强功能本质上是借助于底层的动态代理实现的,换句话说,MyBatis中的四大对象都是代理对象,插件是通过代理的方式增强,缓存是通过装饰的方式增强。
Executor 会拦截到CachingExcecutor 或者BaseExecutor。因为创建Executor 时是先创建CachingExcecutor,再包装拦截。从代码顺序上能看到后面我们会详细分析。
1.1自定义插件
自定义分页插件实现的简易版分页插件:
/*
 * 自定义分页插件实现的简易版分页插件
 */
@Intercepts({
        @Signature(type = Executor.class,method = "query" ,args ={MappedStatement.class, Object.class, RowBounds.class, ResultHandler.class} ), // 需要代理的对象和方法
        @Signature(type = Executor.class,method = "query" ,args ={MappedStatement.class, Object.class, RowBounds.class, ResultHandler.class, CacheKey.class, BoundSql.class} ) // 需要代理的对象和方法
})
public class MyPageInterceptor implements Interceptor {

    @Override
    public Object intercept(Invocation invocation) throws Throwable {
        System.out.println("简易版的分页插件:逻辑分页改成物理分页");

        // 修改sql 拼接Limit 0,10
        Object[] args = invocation.getArgs();
        // MappedStatement 对mapper映射文件里面元素的封装
        MappedStatement ms= (MappedStatement) args[0];
        // BoundSql 对sql和参数的封装
        Object parameterObject=args[1];
        BoundSql boundSql = ms.getBoundSql(parameterObject);
        // RowBounds 封装了逻辑分页的参数 :当前页offset,一页数limit
        RowBounds rowBounds= (RowBounds) args[2];

        // 拿到原来的sql语句
        String sql = boundSql.getSql();
        String limitSql=sql+ " limit "+rowBounds.getOffset()+","+ rowBounds.getLimit();
        //将分页sql重新封装一个BoundSql 进行后续执行
        BoundSql pageBoundSql = new BoundSql(ms.getConfiguration(), limitSql, boundSql.getParameterMappings(), parameterObject);
        // 被代理的对象
        Executor executor= (Executor) invocation.getTarget();
        CacheKey cacheKey = executor.createCacheKey(ms, parameterObject, rowBounds, pageBoundSql);
        // 调用修改过后的sql继续执行查询
        return  executor.query(ms,parameterObject,rowBounds, (ResultHandler) args[3],cacheKey,pageBoundSql);
    }
}
拦截签名跟参数的顺序有严格要求,如果按照顺序找不到对应方法会抛出异常:
 org.apache.ibatis.exceptions.PersistenceException:
            ### Error opening session.  Cause: org.apache.ibatis.plugin.PluginException:
            Could not find method on interface org.apache.ibatis.executor.Executor named query
分页插件使用
1,添加pom依赖:
<dependency>
	<groupId>com.github.pagehelper</groupId>
	<artifactId>pagehelper</artifactId>
	<version>1.2.15</version>
</dependency>
2,插件注册,在mybatis-config.xml 中注册插件:
<configuration>
	<plugins>
		<!-- com.github.pagehelper为PageHelper类所在包名 -->
		<plugin interceptor="com.github.pagehelper.PageHelper">
			<property name="helperDialect" value="mysql" />
			<!-- 该参数默认为false -->
			<!-- 设置为true时,会将RowBounds第一个参数offset当成pageNum页码使用 -->
			<!-- 和startPage中的pageNum效果一样 -->
			<property name="offsetAsPageNum" value="true" />
			<!-- 该参数默认为false -->
			<!-- 设置为true时,使用RowBounds分页会进行count查询 -->
			<property name="rowBoundsWithCount" value="true" />
			<!-- 设置为true时,如果pageSize=0或者RowBounds.limit = 0就会查询出全部的结果 -->
			<!-- (相当于没有执行分页查询,但是返回结果仍然是Page类型) -->
			<property name="pageSizeZero" value="true" />
			<!-- 3.3.0版本可用 - 分页参数合理化,默认false禁用 -->
			<!-- 启用合理化时,如果pageNum<1会查询第一页,如果pageNum>pages会查询最后一页 -->
			<!-- 禁用合理化时,如果pageNum<1或pageNum>pages会返回空数据 -->
			<property name="reasonable" value="true" />
			<!-- 3.5.0版本可用 - 为了支持startPage(Object params)方法 -->
			<!-- 增加了一个`params`参数来配置参数映射,用于从Map或ServletRequest中取值 -->
			<!-- 可以配置pageNum,pageSize,count,pageSizeZero,reasonable,不配置映射的用默认值 -->
			<!-- 不理解该含义的前提下,不要随便复制该配置 -->
			<property name="params" value="pageNum=start;pageSize=limit;" />
		</plugin>
	</plugins>
</configuration>
3,调用:
// 获取配置文件
InputStream inputStream = Resources.getResourceAsStream("mybatis/mybatis-config.xml");
// 通过加载配置文件获取SqlSessionFactory对象
SqlSessionFactory factory = new SqlSessionFactoryBuilder().build(inputStream);
try (SqlSession sqlSession = sqlSessionFactory.openSession()) {
    // Mybatis在getMapper就会给我们创建jdk动态代理
    EmpMapper mapper = sqlSession.getMapper(EmpMapper.class);
    PageHelper.startPage(1, 5);
    List<Emp> list=mapper.selectAll();
    PageInfo<ServiceStation> info = new PageInfo<ServiceStation>(list, 3);
          System.out.println("当前页码:"+info.getPageNum());
          System.out.println("每页的记录数:"+info.getPageSize());
          System.out.println("总记录数:"+info.getTotal());
          System.out.println("总页码:"+info.getPages());
          System.out.println("是否第一页:"+info.isIsFirstPage());
          System.out.println("连续显示的页码:");
          int[] nums = info.getNavigatepageNums();
          for (int i = 0; i < nums.length; i++) {
               System.out.println(nums[i]);
          }
}
以上就是对插件的简单应用。
1.1插件加载
mybatis的简单使用:
public class App {
	public static void main(String[] args) {
		String resource = "mybatis‐config.xml";
		Reader reader;
		try {
			//将XML配置文件构建为Configuration配置类
			reader = Resources.getResourceAsReader(resource);
			// 通过加载配置文件流构建一个SqlSessionFactory DefaultSqlSessionFactory
			SqlSessionFactory sqlMapper = new SqlSessionFactoryBuilder().build(reader);
			// 数据源 执行器 DefaultSqlSession
			SqlSession session = sqlMapper.openSession();
			try {
				// 执行查询 底层执行jdbc
				//User user = (User)session.selectOne("com.tuling.mapper.selectById", 1);
				UserMapper mapper = session.getMapper(UserMapper.class);
				System.out.println(mapper.getClass());
				User user = mapper.selectById(1L);
				System.out.println(user.getUserName());
			} catch (Exception e) {
 				e.printStackTrace();
 			}finally {
 				session.close();
			}
		} catch (IOException e) {
			e.printStackTrace();
		}
	}
}
通过上面代码发现,通过myabtis的核心配置文件创建了SqlSessionFactory,所以我们SqlSessionFactoryBuilder中的builder,进去一探究竟:
 public SqlSessionFactory build(Reader reader) {
        return this.build((Reader)reader, (String)null, (Properties)null);
}继续跟进this.build((Reader)reader, (String)null, (Properties)null)方法:
public SqlSessionFactory build(Reader reader, String environment, Properties properties) {
        SqlSessionFactory var5;
        try {
            // 创建一个XML配置类解析类XMLConfigBuilder
            XMLConfigBuilder parser = new XMLConfigBuilder(reader, environment, properties);
            // 通XML配置类解析类的parse方法解析配置文件,build方法返回DefaultSqlSessionFactory
            var5 = this.build(parser.parse());
        } catch (Exception var14) {
            throw ExceptionFactory.wrapException("Error building SqlSession.", var14);
        } finally {
            ErrorContext.instance().reset();

            try {
                reader.close();
            } catch (IOException var13) {
            }

        }

        return var5;
}继续查看XMLConfigBuilder的parse()方法:
public Configuration parse() {
       // 通过parsed判断是否解析过配置类
        if (this.parsed) {
            // 如果解析过直接抛出异常
            throw new BuilderException("Each XMLConfigBuilder can only be used once.");
        } else {
            // 没有解析过,开始解析之前,将parsed置为true
            this.parsed = true;
            // 开始解析configuration节点
            this.parseConfiguration(this.parser.evalNode("/configuration"));
            return this.configuration;
        }
}继续跟进this.parseConfiguration(this.parser.evalNode("/configuration"));方法:
private void parseConfiguration(XNode root) {
        try {
            // 解析properties标签,并set到Configration对象中
            this.propertiesElement(root.evalNode("properties"));
            // 解析setting标签
            Properties settings = this.settingsAsProperties(root.evalNode("settings"));
            // 添加vfs的自定义实现,这个功能不怎么用
            this.loadCustomVfs(settings);
            // 配置日志实现类,这个功能也不怎么用
            this.loadCustomLogImpl(settings);
            // 解析typeAliases标签,配置类的别名,配置后就可以用别名来替代全限定名
            this.typeAliasesElement(root.evalNode("typeAliases"));
            // 解析plugins标签,将解析拦截器和拦截器的属性,set到Configration的interceptorChain中
            this.pluginElement(root.evalNode("plugins"));
            // Mybatis创建对象是会使用objectFactory来创建对象,一般情况下不会自己配置这个objectFactory,使用系统默认的
            this.objectFactoryElement(root.evalNode("objectFactory"));
            this.objectWrapperFactoryElement(root.evalNode("objectWrapperFactory"));
            this.reflectorFactoryElement(root.evalNode("reflectorFactory"));
            // 设置在setting标签中配置的配置
            this.settingsElement(settings);
            // 解析环境信息,包括事物管理器和数据源,SqlSessionFactoryBuilder在解析时需要指定环境id,如果不指定的话,会选择默认的环境;
            //最 后将这些信息set到Configration的Environment属性里面
            this.environmentsElement(root.evalNode("environments"));
            this.databaseIdProviderElement(root.evalNode("databaseIdProvider"));
            // 无论是 MyBatis 在预处理语句(PreparedStatement)中设置一个参数时,还是从结果集中取出一个值时,都会用类型处理器将获取的值以合适的方式转换成 Java 类型。解析typeHandler。
            this.typeHandlerElement(root.evalNode("typeHandlers"));
            // 解析Mapper文件
            this.mapperElement(root.evalNode("mappers"));
        } catch (Exception var3) {
            throw new BuilderException("Error parsing SQL Mapper Configuration. Cause: " + var3, var3);
        }
    }
查看 this.pluginElement(root.evalNode("plugins"));方法:
private void pluginElement(XNode parent) throws Exception {
        if (parent != null) {
            // 获取plugins的子标签,即plugin标签。
            Iterator var2 = parent.getChildren().iterator();
            // 遍历
            while(var2.hasNext()) {
                XNode child = (XNode)var2.next();
                // 获取plugin标签的interceptor属性
                String interceptor = child.getStringAttribute("interceptor");
                // 获取plugin标签的property标签
                Properties properties = child.getChildrenAsProperties();
                // 创建插件实例
                Interceptor interceptorInstance = (Interceptor)this.resolveClass(interceptor).getDeclaredConstructor().newInstance();
                // 设置插件的属性
                interceptorInstance.setProperties(properties);
                // 将插件保存到configuration的InterceptorChain成员变量中,InterceptorChain中有一个List<Interceptor> interceptors,来保存插件
                this.configuration.addInterceptor(interceptorInstance);
            }
        }

}总结:在解析mybatis核心配置文件的plugin标签时,将插件插件保存到configuration的InterceptorChain成员变量中,InterceptorChain中有一个List<Interceptor> interceptors成员变量维护。
1.2创建代理
1.2.1Executor插件
mybatis的插件就是拦截器,增强功能本质上是借助于底层的动态代理实现的,换句话说MyBatis中的四大对象都是代理对象。在加载mybatis的核心配置文件时,已经创建好了拦截器,那什么时候创建四大对象都是代理对象的代理的,我们接着往下看
查看获取SqlSession的过程,查看SqlSession session = sqlMapper.openSession();方法,DefaultSqlSessionFactory实现SqlSessionFactory接口:
public SqlSession openSession() {
    	// this.configuration.getDefaultExecutorType()方法,获取默认的Executor
    	// openSessionFromDataSource方法是构建SqlSession的
        return this.openSessionFromDataSource(this.configuration.getDefaultExecutorType(), (TransactionIsolationLevel)null, false);
}继续跟进this.openSessionFromDataSource(this.configuration.getDefaultExecutorType(), (TransactionIsolationLevel)null, false);方法:
private SqlSession openSessionFromDataSource(ExecutorType execType, TransactionIsolationLevel level, boolean autoCommit) {
        Transaction tx = null;

        DefaultSqlSession var8;
        try {
            // 获取环境配置
            Environment environment = this.configuration.getEnvironment();
            // 根据环境配置创建TransactionFactory
            TransactionFactory transactionFactory = this.getTransactionFactoryFromEnvironment(environment);
            tx = transactionFactory.newTransaction(environment.getDataSource(), level, autoCommit);
            // 创建执行器
            Executor executor = this.configuration.newExecutor(tx, execType);
            // 根据Executor创建SqlSession
            var8 = new DefaultSqlSession(this.configuration, executor, autoCommit);
        } catch (Exception var12) {
            this.closeTransaction(tx);
            throw ExceptionFactory.wrapException("Error opening session.  Cause: " + var12, var12);
        } finally {
            ErrorContext.instance().reset();
        }

        return var8;
}查看创建执行器的Executor executor = this.configuration.newExecutor(tx, execType);方法:
public Executor newExecutor(Transaction transaction, ExecutorType executorType) {
        executorType = executorType == null ? this.defaultExecutorType : executorType;
        executorType = executorType == null ? ExecutorType.SIMPLE : executorType;
        Object executor;
        if (ExecutorType.BATCH == executorType) { // 批处理执行器
            executor = new BatchExecutor(this, transaction);
        } else if (ExecutorType.REUSE == executorType) { // 重新使用执行器
            executor = new ReuseExecutor(this, transaction);
        } else { // 简单执行器
            executor = new SimpleExecutor(this, transaction);
        }

        if (this.cacheEnabled) {
            executor = new CachingExecutor((Executor)executor); // 普通的执行器装饰成缓存执行器
        }

    	// this.interceptorChain中存放的是mybatis核心配置文件配置的插件
    	// pluginAll方法中,使用了代理+装饰者模式的方式,创建Executor
        Executor executor = (Executor)this.interceptorChain.pluginAll(executor);
        return executor;
}还记得interceptorChain吗?在解析mybatis核心配置文件的plugin标签时,将插件插件保存到configuration的InterceptorChain成员变量中,InterceptorChain中有一个List<Interceptor> interceptors成员变量维护。
继续跟进this.interceptorChain.pluginAll(executor)方法:
public Object pluginAll(Object target) {
        Interceptor interceptor;
    	// 遍历,通过Interceptor的plugin方法生成代理对象
        for(Iterator var2 = this.interceptors.iterator(); var2.hasNext(); target = interceptor.plugin(target)) {
            interceptor = (Interceptor)var2.next();
        }

        return target;
}继续跟进target = interceptor.plugin(target)方法:
default Object plugin(Object target) {
        return Plugin.wrap(target, this);
    }
public static Object wrap(Object target, Interceptor interceptor) {
// 解析插件@Intercepts注解
Map<Class<?>, Set<Method>> signatureMap = getSignatureMap(interceptor);
// 获取被代理的Class类型
Class<?> type = target.getClass();
// 代理的方法
Class<?>[] interfaces = getAllInterfaces(type, signatureMap);
// 看到Proxy.newProxyInstance方法就可以了,他是Jdk创建代理的方法
return interfaces.length > 0 ? Proxy.newProxyInstance(type.getClassLoader(), interfaces, new Plugin(target, interceptor, signatureMap)) : target;
}这里创建Plugin:
// 实现了InvocationHandler这个接口jdk代理
public class Plugin implements InvocationHandler {
    private final Object target;
    private final Interceptor interceptor;
    private final Map<Class<?>, Set<Method>> signatureMap;
    private Plugin(Object target, Interceptor interceptor, Map<Class<?>, Set<Method>> signatureMap) {
        this.target = target;
        this.interceptor = interceptor;
        this.signatureMap = signatureMap;
    }
  //
   public Object invoke(Object proxy, Method method, Object[] args) throws Throwable {
        try {
           // 这里的方法是,解析插件@Intercepts注解获取的
            Set<Method> methods = (Set)this.signatureMap.get(method.getDeclaringClass());
	   // 这里判断当前调用的方法,是否是@Intercepts注解解析后需要拦截的方法,如果不是直接调用,否者调用插件的方法
            return methods != null && methods.contains(method) ? this.interceptor.intercept(new Invocation(this.target, method, args)) : method.invoke(this.target, args);
        } catch (Exception var5) {
            throw ExceptionUtil.unwrapThrowable(var5);
        }
    }
}
判断当前调用的方法,是否是@Intercepts注解解析后需要拦截的方法,跟进 Map<Class<?>, Set<Method>> signatureMap = getSignatureMap(interceptor);方法:
private static Map<Class<?>, Set<Method>> getSignatureMap(Interceptor interceptor) {
    // 获取拦截器上的 Intercepts 注解
    Intercepts interceptsAnnotation = interceptor.getClass().getAnnotation(Intercepts.class);
    // issue #251
    if (interceptsAnnotation == null) {
      throw new PluginException("No @Intercepts annotation was found in interceptor " + interceptor.getClass().getName());
    }
    // 得到注解的 type、 method、parameter参数,放入Map中,返回
    Signature[] sigs = interceptsAnnotation.value();
    Map<Class<?>, Set<Method>> signatureMap = new HashMap<>();
    for (Signature sig : sigs) {
        // computeIfAbsent方法判断一个map中是否存在这个key,如果存在则处理value的数据,如果不存在,则创建一个满足value要求的数据结构放到value中
      Set<Method> methods = signatureMap.computeIfAbsent(sig.type(), k -> new HashSet<>());

      try {
        Method method = sig.type().getMethod(sig.method(), sig.args());
        methods.add(method);
      } catch (NoSuchMethodException e) {
        throw new PluginException("Could not find method on " + sig.type() + " named " + sig.method() + ". Cause: " + e, e);
      }
    }
    return signatureMap;
}获取代理的方法,跟进Class<?>[] interfaces = getAllInterfaces(type, signatureMap);方法:
private static Class<?>[] getAllInterfaces(Class<?> type, Map<Class<?>, Set<Method>> signatureMap) {
    Set<Class<?>> interfaces = new HashSet<>();
    while (type != null) {
      for (Class<?> c : type.getInterfaces()) {
         // 判断type是否包含signatureMap的方法
        if (signatureMap.containsKey(c)) {
          interfaces.add(c);
        }
      }
      type = type.getSuperclass();
    }
    return interfaces.toArray(new Class<?>[0]);
  }
以上就是Executor插件代理对象的创建流程。
1.2.2StatementHandler插件
我们执行通过sqlSession执行CRUD炒作,本质上时通过Executor执行的,我们以SimpleExecutor的doQuery方法为例,至于为什么会是SimpleExecutor的doQuery方法可以看我写的mybatis源码解析sql执行的文章。
SimpleExecutor的doQuery方法:
public <E> List<E> doQuery(MappedStatement ms, Object parameter, RowBounds rowBounds, ResultHandler resultHandler, BoundSql boundSql) throws SQLException {
        Statement stmt = null;

        List var9;
        try {
            // 获取解析mybatis核心配置文件时创建的Configuration
            Configuration configuration = ms.getConfiguration();
            // 创建StatementHandler
            StatementHandler handler = configuration.newStatementHandler(this.wrapper, ms, parameter, rowBounds, resultHandler, boundSql);
            stmt = this.prepareStatement(handler, ms.getStatementLog());
            // 执行sql查询
            var9 = handler.query(stmt, resultHandler);
        } finally {
            this.closeStatement(stmt);
        }

        return var9;
}跟进StatementHandler handler = configuration.newStatementHandler(this.wrapper, ms, parameter, rowBounds, resultHandler, boundSql);方法:
public StatementHandler newStatementHandler(Executor executor, MappedStatement mappedStatement, Object parameterObject, RowBounds rowBounds, ResultHandler resultHandler, BoundSql boundSql) {
   		 // 创建ParameterHandler和ResultSetHandler插件的代理,这个在1.2.3和1.2.4中介绍
        StatementHandler statementHandler = new RoutingStatementHandler(executor, mappedStatement, parameterObject, rowBounds, resultHandler, boundSql);
    	// 创建StatementHandler插件
        StatementHandler statementHandler = (StatementHandler)this.interceptorChain.pluginAll(statementHandler);
        return statementHandler;
}由上面的代码可以发现在一this.interceptorChain.pluginAll()方法创建代理对象。
1.2.3ParameterHandler插件
我们继续跟进StatementHandler statementHandler = new RoutingStatementHandler(executor, mappedStatement, parameterObject, rowBounds, resultHandler, boundSql);方法看看如何创建ParameterHandler和ResultSetHandler插件的代理,RoutingStatementHandler的构造方法:
 public RoutingStatementHandler(Executor executor, MappedStatement ms, Object parameter, RowBounds rowBounds, ResultHandler resultHandler, BoundSql boundSql) {
     	// 判断当前SQL语句是要用哪一种操作方式来进行。
     	switch(ms.getStatementType()) {
        case STATEMENT:
            this.delegate = new SimpleStatementHandler(executor, ms, parameter, rowBounds, resultHandler, boundSql);
            break;
        case PREPARED: //默认情况下是用Prepared方式
            this.delegate = new PreparedStatementHandler(executor, ms, parameter, rowBounds, resultHandler, boundSql);
            break;
        case CALLABLE:
            this.delegate = new CallableStatementHandler(executor, ms, parameter, rowBounds, resultHandler, boundSql);
            break;
        default:
            throw new ExecutorException("Unknown statement type: " + ms.getStatementType());
        }

}继续跟进this.delegate = new PreparedStatementHandler(executor, ms, parameter, rowBounds, resultHandler, boundSql);方法:
public PreparedStatementHandler(Executor executor, MappedStatement mappedStatement, Object parameter, RowBounds rowBounds, ResultHandler resultHandler, BoundSql boundSql) {
    	// 调用父类BaseStatementHandler的构造方法
        super(executor, mappedStatement, parameter, rowBounds, resultHandler, boundSql);
    }
父类BaseStatementHandler的构造方法:
protected BaseStatementHandler(Executor executor, MappedStatement mappedStatement, Object parameterObject, RowBounds rowBounds, ResultHandler resultHandler, BoundSql boundSql) {
        this.configuration = mappedStatement.getConfiguration();
        this.executor = executor;
        this.mappedStatement = mappedStatement;
        this.rowBounds = rowBounds;
        this.typeHandlerRegistry = this.configuration.getTypeHandlerRegistry();
        this.objectFactory = this.configuration.getObjectFactory();
        if (boundSql == null) {
            this.generateKeys(parameterObject);
            boundSql = mappedStatement.getBoundSql(parameterObject);
        }

        this.boundSql = boundSql;
   		//	创建ParameterHandler的代理对象
        this.parameterHandler = this.configuration.newParameterHandler(mappedStatement, parameterObject, boundSql);
   		// 创建ResultSetHandler的代理对象,在1.2.4中介绍
        this.resultSetHandler = this.configuration.newResultSetHandler(executor, mappedStatement, rowBounds, this.parameterHandler, resultHandler, boundSql);
}跟进this.parameterHandler = this.configuration.newParameterHandler(mappedStatement, parameterObject, boundSql);方法:
public ParameterHandler newParameterHandler(MappedStatement mappedStatement, Object parameterObject, BoundSql boundSql) {
        ParameterHandler parameterHandler = mappedStatement.getLang().createParameterHandler(mappedStatement, parameterObject, boundSql);
        // 再再一次通过this.interceptorChain.pluginAll创建代理
        parameterHandler = (ParameterHandler)this.interceptorChain.pluginAll(parameterHandler);
        return parameterHandler;
    }
1.2.4ResultSetHandler插件
跟进 this.resultSetHandler = this.configuration.newResultSetHandler(executor, mappedStatement, rowBounds, this.parameterHandler, resultHandler, boundSql);方法:
public ResultSetHandler newResultSetHandler(Executor executor, MappedStatement mappedStatement, RowBounds rowBounds, ParameterHandler parameterHandler, ResultHandler resultHandler, BoundSql boundSql) {
        ResultSetHandler resultSetHandler = new DefaultResultSetHandler(executor, mappedStatement, parameterHandler, resultHandler, boundSql, rowBounds);
    	// 再再一次通过this.interceptorChain.pluginAll创建代理
        ResultSetHandler resultSetHandler = (ResultSetHandler)this.interceptorChain.pluginAll(resultSetHandler);
        return resultSetHandler;
    }
1.3调用流程
调用非常简单,当调用上面的可拦截方法,会调用代理对象的增强方法。
创建四个组件都会通过interceptorChain.pluginAll(executor)方法创建,他会遍历所有的插件创建代理对象的代理对象如下:
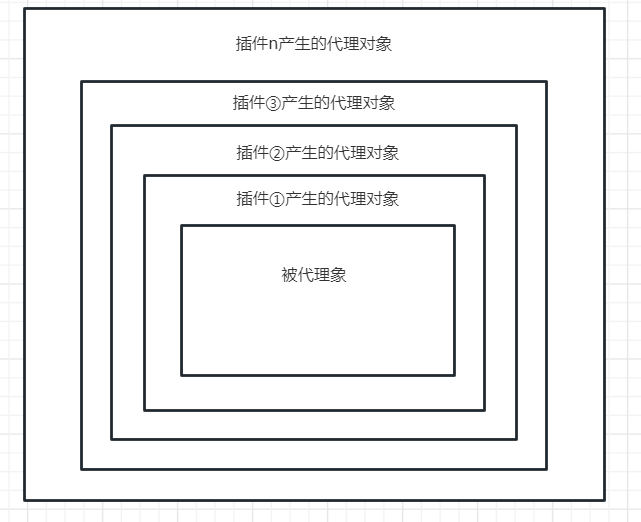
当我们调用的可拦截方法,会调用代理对象的增强方法会外到内的顺序依次调用。